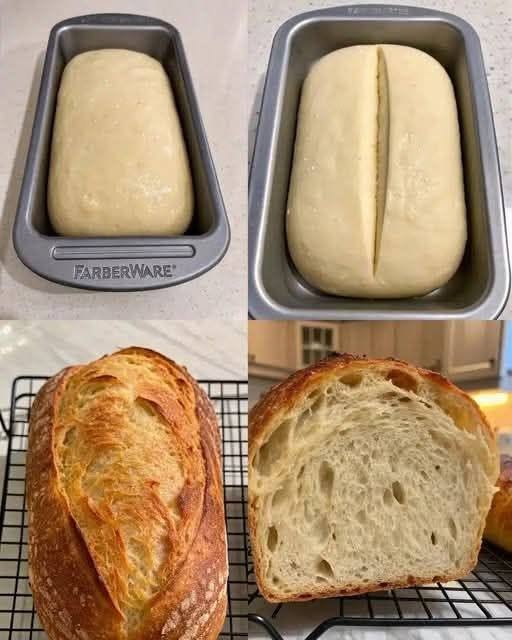
If you’ve been searching for a reliable no-knead gluten-free sourdough bread recipe, you’re in the right place. Unlike traditional wheat sourdough, gluten-free sourdough relies on a combination of gluten-free flours, psyllium husk, and a healthy gluten-free sourdough starter to create a loaf with a light crumb, chewy texture, and crisp crust. The best part? There is no kneading required, making this recipe perfect for beginners and experienced bakers alike.
This artisan-style loaf has a mild tang, beautiful oven spring, and stays fresh for several days. Whether you enjoy it toasted with butter, use it for sandwiches, or serve it alongside soup, this bread is a delicious addition to your gluten-free kitchen.
Why You’ll Love This Recipe
- 100% gluten-free
- No kneading required
- Naturally fermented
- Crispy artisan crust
- Soft, airy interior
- Dairy-free
- Vegan-friendly
- Easy enough for beginners
- Perfect for sandwiches and toast
- Freezer-friendly
Ingredients
Dry Ingredients
- 200 g brown rice flour
- 150 g sorghum flour
- 100 g tapioca starch
- 50 g potato starch
- 20 g psyllium husk powder
- 10 g fine sea salt
Wet Ingredients
- 150 g active gluten-free sourdough starter
- 420 g warm water
- 20 g olive oil
- 15 g maple syrup or honey (optional)
Equipment
- Digital kitchen scale
- Large mixing bowl
- Wooden spoon or spatula
- Banneton or bowl lined with a towel
- Dutch oven with lid
- Parchment paper
- Bread lame or sharp knife
- Cooling rack
Before You Begin
Your gluten-free sourdough starter should be:
- Active
- Doubled in size
- Full of bubbles
- Pleasantly tangy
- Fed 4–8 hours before baking
An active starter produces the best rise and flavor.
Instructions
Step 1: Mix the Dry Ingredients
In a large mixing bowl combine:
- Brown rice flour
- Sorghum flour
- Tapioca starch
- Potato starch
- Psyllium husk powder
- Salt
Whisk thoroughly until evenly mixed.
Step 2: Mix the Wet Ingredients
In another bowl stir together:
- Warm water
- Active sourdough starter
- Olive oil
- Maple syrup
Mix until smooth.
Step 3: Make the Dough
Pour the wet ingredients into the dry ingredients.
Using a sturdy spoon or silicone spatula, stir until no dry flour remains.
The dough should resemble a thick sticky batter rather than traditional wheat dough.
Do not knead.
Continue mixing for about 3 minutes to fully hydrate the psyllium husk.
Step 4: Rest the Dough
Allow the dough to sit for 15 minutes.
During this time the psyllium absorbs water and transforms the mixture into a workable dough.
You’ll notice it becoming thicker and easier to handle.
Step 5: Shape the Loaf
Lightly wet your hands.
Shape the dough into a smooth round or oval loaf.
Place it seam-side up in a well-floured banneton or a bowl lined with a towel dusted with rice flour.
Step 6: First and Only Rise
Cover the dough with plastic wrap or a damp towel.
Let it ferment for 4–6 hours at room temperature.
The dough should:
- Puff noticeably
- Increase by around 40–60%
- Feel airy
- Show small bubbles
Avoid over-proofing.
Step 7: Preheat
Thirty minutes before baking:
Preheat your oven to 475°F (245°C).
Place the Dutch oven inside while preheating.
A thoroughly heated Dutch oven creates exceptional oven spring.
Step 8: Score
Carefully turn the dough onto parchment paper.
Dust lightly with rice flour.
Using a bread lame or sharp knife, score the top about ½ inch deep.
Simple cuts work best.
Step 9: Bake Covered
Transfer the loaf into the hot Dutch oven.
Cover with the lid.
Bake for 45 minutes.
Step 10: Bake Uncovered
Remove the lid.
Reduce oven temperature to 450°F (230°C).
Bake another 20–25 minutes until deeply golden brown.
Step 11: Cool Completely
Transfer to a cooling rack.
Allow the loaf to cool for at least 3 hours before slicing.
Cutting too early can make the crumb gummy.
Baker’s Tips
- Always weigh ingredients for consistent results.
- Fresh psyllium husk powder gives the best structure.
- Avoid adding extra flour if the dough feels sticky.
- Don’t rush the cooling process.
- Bake in a Dutch oven for the crispiest crust.
- Rice flour works well for dusting because it doesn’t absorb much moisture.
- Keep your starter healthy with regular feedings.
Variations
Seeded Bread
Fold in:
- 30 g sunflower seeds
- 30 g pumpkin seeds
- 15 g sesame seeds
Herb Bread
Add:
- 2 teaspoons rosemary
- 1 teaspoon thyme
- 1 teaspoon garlic powder
Everything Bagel
Sprinkle with:
- Sesame seeds
- Poppy seeds
- Dried onion
- Dried garlic
- Flaky salt
Olive Bread
Mix in:
- 75 g chopped olives
- 1 teaspoon oregano
Troubleshooting
Dense Bread
Possible causes:
- Weak starter
- Under-proofing
- Too much flour
Gummy Interior
Usually caused by:
- Cutting too soon
- Underbaking
- Excess water
Flat Loaf
May happen if:
- Dough over-proofed
- Starter inactive
- Too much hydration
Thick Crust
Try:
- Baking a little shorter uncovered
- Wrapping the cooled loaf in a towel for one hour
Serving Ideas
Enjoy this bread with:
- Butter
- Jam
- Peanut butter
- Avocado
- Eggs
- Soup
- Sandwiches
- Bruschetta
- Garlic toast
- French toast
Storage
Room Temperature
Store in a bread bag or airtight container for up to 3 days.
Refrigerator
Keeps for 5–6 days.
Toast before serving.
Freezer
Slice first.
Freeze for up to 3 months.
Toast slices directly from frozen.
Nutrition (Per Slice – Approximate)
- Calories: 165
- Carbohydrates: 31 g
- Protein: 3 g
- Fat: 4 g
- Fiber: 4 g
- Sugar: 1 g
- Sodium: 220 mg
Frequently Asked Questions
Can I make this without a Dutch oven?
Yes. Bake on a preheated baking stone or tray and place a pan of hot water on the lower oven rack to create steam.
Can I use only one gluten-free flour?
No. A blend of whole-grain flours and starches provides the best balance of flavour, structure, and texture.
Can I skip the psyllium husk?
No. Psyllium is essential because it replaces the elasticity that gluten normally provides.
How do I know my starter is ready?
It should double in size within 4–8 hours after feeding, smell pleasantly sour, and be filled with bubbles.
Can I proof the dough overnight?
Yes. After shaping, refrigerate the dough for 8–12 hours. Bake directly from the refrigerator for a deeper sourdough flavour.
Why is my dough sticky?
Gluten-free sourdough dough is naturally much wetter than wheat dough. Resist adding extra flour unless the mixture is extremely loose.
Final Thoughts
This No-Knead Gluten-Free Sourdough Bread delivers everything you want in a homemade artisan loaf: a crisp, crackly crust, a tender crumb, and the rich, tangy flavour that only natural fermentation can provide. With no kneading, simple ingredients, and straightforward steps, it’s an approachable recipe for bakers of all skill levels. Once you’ve mastered this base loaf, you can easily customise it with herbs, seeds, olives, or spices to create endless delicious variations. Whether you’re baking for a gluten-free household or simply exploring naturally fermented bread, this recipe is one you’ll return to again and again.

