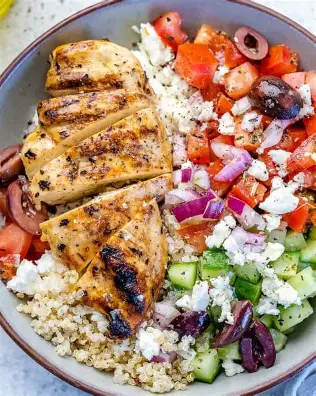
There’s a particular kind of bowl that looks like it belongs on a restaurant menu but is actually simple enough to make on a weeknight, and this Greek Chicken & Quinoa Bowl is exactly that. Char-grilled chicken, nutty quinoa, crisp cucumber and tomato, salty feta and briny olives all come together in one bowl, each ingredient kept distinct rather than mixed together, the way you’d see it plated at a Mediterranean restaurant. This version has been adjusted specifically to match a reference photo, right down to the grill marks on the chicken and the way the toppings are arranged, so if you’re trying to recreate a picture you saved, this is the recipe to follow.
Why This Version Is Different From a Standard Greek Bowl
Most Greek chicken bowl recipes call for rice, a light scattering of toppings, and a yogurt sauce drizzled over everything. That version is delicious, but it doesn’t look like the photo you’re working from. To get the exact same result, three things change here: quinoa replaces rice for a different texture and appearance, the chicken is cooked on a ridged grill pan specifically to create visible char lines, and the toppings are used generously and arranged in sections rather than sprinkled lightly and tossed together. The yogurt sauce, instead of being drizzled over the top, is served on the side, since the image shows a clean, saucefree surface.
Why Getting the Exact Look Right Is Trickier Than It Seems
Recreating a photo isn’t just about following a recipe, it’s about paying attention to small choices that change the final appearance without changing the flavor much at all. A flat skillet and a ridged grill pan produce nearly identical taste, but only one produces the browned stripes you see in a photo. Light garnish and generous garnish taste similar per bite, but they look completely different in a bowl. And a sauce that’s mixed in disappears, while the same sauce served on the side keeps the bowl looking composed and photogenic. This recipe accounts for all three differences, so read through the notes as you cook, not just the ingredient list.
Ingredients
For the Chicken
- 1½ pounds boneless, skinless chicken breasts
- 2 tablespoons olive oil
- 1 tablespoon lemon juice
- 2 cloves garlic, minced
- 1 teaspoon dried oregano
- ½ teaspoon paprika
- ½ teaspoon dried parsley
- ½ teaspoon salt
- ¼ teaspoon black pepper
For the Quinoa
- 1 cup quinoa, rinsed
- 2 cups water or chicken broth
- 1 tablespoon olive oil
- ½ teaspoon salt
For the Toppings (Generous Amounts)
- 1 cucumber, diced
- 1 cup cherry tomatoes, diced
- ¼ red onion, thinly sliced
- ⅔ cup crumbled feta cheese
- ½ cup Kalamata olives, halved
- 2 tablespoons fresh parsley, chopped
For the Yogurt Sauce (Served on the Side)
- ½ cup plain Greek yogurt
- 1 tablespoon lemon juice
- 1 small garlic clove, finely minced
- 1 tablespoon chopped fresh dill or parsley
- 1 tablespoon water, or more as needed
- Pinch of salt
- Pinch of black pepper
A note on ingredients: quinoa is the single biggest factor in matching the photo, since its small, curled grains have a completely different look from rice once cooked. Don’t substitute rice here if the visual match matters to you. Chicken breast is used rather than thighs because it holds a flatter, more even surface for the grill marks to form clearly. If you only have thighs, they’ll still work, but expect slightly less defined lines due to their uneven thickness.
Step-by-Step Instructions
1. Marinate the chicken. In a bowl, combine the olive oil, lemon juice, minced garlic, oregano, paprika, dried parsley, salt and pepper. Add the chicken breasts and turn them to coat evenly on all sides. Cover and let them marinate for at least 15 minutes at room temperature, or refrigerate for up to a few hours if you want a deeper flavor. Don’t skip this step even if you’re short on time, since even a short marinade makes a noticeable difference in the final flavor.
2. Rinse and cook the quinoa. Rinse the quinoa under cold running water in a fine-mesh strainer for about 30 seconds. This removes the natural coating that can make quinoa taste bitter. Add the rinsed quinoa, water or broth, olive oil and salt to a saucepan and bring it to a boil over medium-high heat. Once boiling, reduce the heat to low, cover the pan, and simmer for 15 to 18 minutes, until the liquid is fully absorbed and you can see the little curled germ separate from each grain. Remove from the heat and let it rest, still covered, for 5 minutes. Fluff gently with a fork before serving.
3. Heat the grill pan properly. Place a ridged cast iron or non-stick grill pan over medium-high heat and let it heat for a full 3 to 4 minutes before adding anything. This step matters more than it seems, because a pan that isn’t hot enough won’t sear the ridges into the chicken, and you’ll end up with pale stripes instead of the deep brown lines in the photo. You should be able to feel strong heat radiating up from the pan before you start cooking.
4. Grill the chicken without moving it. Lay the marinated chicken breasts onto the hot grill pan, leaving space between each piece. Resist the urge to move, press, or check them for at least 4 to 5 minutes. Constant movement is the main reason grill marks fail to form, since the ridges need sustained, undisturbed contact with the chicken to leave a clear line. After 4 to 5 minutes, lift one edge to check: if it releases cleanly and shows dark brown lines, it’s ready to flip.
5. Flip and finish cooking. Turn the chicken over and cook the second side for another 4 to 6 minutes, again without moving it, until it reaches an internal temperature of 165°F (74°C) at the thickest part. Cooking time will vary depending on the thickness of your chicken breasts, so use a meat thermometer rather than relying on time alone, especially if some pieces are noticeably thicker than others.
6. Rest and slice the chicken. Transfer the cooked chicken to a cutting board and let it rest for 5 minutes before slicing. This resting period allows the juices to redistribute, so the chicken stays moist when you cut into it. Slice each breast on a slight diagonal into thick strips, about ½ inch wide, so the grill marks remain visible across the top of each slice, matching the fanned-out arrangement in the photo.
7. Prepare the fresh toppings. While the chicken rests, dice the cucumber and cherry tomatoes into similar-sized pieces, and thinly slice the red onion. Chop the parsley. Keep each ingredient in its own small pile rather than combining them, since the image shows distinct sections of vegetables rather than a tossed salad.
8. Assemble the bowl in sections. Spoon a generous bed of quinoa into the bottom of a wide, shallow bowl, spreading it out so it fills most of the surface. Arrange the sliced chicken fanned out across one side of the bowl, slightly overlapping each piece. Next to the chicken, place the diced cucumber in its own section, the tomatoes in another, and the sliced red onion scattered over or near the tomatoes. Keep each topping visually separate rather than mixing them into the quinoa.
9. Add the feta and olives generously. Scatter the crumbled feta liberally over the vegetables and chicken, more heavily than you might for a typical light garnish. Distribute the halved Kalamata olives throughout the bowl in small clusters rather than a few scattered pieces. The photo uses a noticeably generous hand with both, and that generosity is a big part of why the finished bowl looks abundant rather than sparse.
10. Finish and serve. Sprinkle the chopped parsley over the entire bowl as a final touch. Whisk together the yogurt, lemon juice, minced garlic, dill or parsley, water, salt and pepper in a small separate bowl or ramekin, and serve it alongside the main bowl rather than pouring it over the top. This keeps the surface of the bowl clean and matches the photo, while still giving anyone eating it the option to add the sauce themselves.
Getting the Presentation Right
A few small habits make the biggest difference between a bowl that tastes right and one that looks right too. Don’t rush the grill pan step, since a properly preheated pan is the only way to get defined char lines rather than pale, uneven stripes. Keep your toppings in loose sections instead of tossing the bowl together, because a composed presentation reads very differently from a mixed salad, even with identical ingredients. Use a wide, shallow bowl rather than a deep one, since it gives you more surface area to arrange everything the way it appears in the photo, with the chicken fanned out and the vegetables visible in their own areas.
Easy Variations
If you want to keep the same visual style but change the flavors slightly, this recipe adapts easily. Swap the chicken for grilled shrimp or salmon if you prefer seafood, keeping the same grill-pan technique for the same charred look. For a vegetarian version, grill thick slices of zucchini or eggplant using the same hot-pan, don’t-move-it method to get similar char marks. You can also swap the quinoa for a mix of quinoa and bulgur if you want a slightly different texture while keeping the same general appearance.
Storage and Meal Prep
If you’re making this ahead, store the quinoa, chicken and toppings in separate airtight containers in the refrigerator, since keeping them apart prevents the vegetables from turning watery and the quinoa from getting soggy. The yogurt sauce keeps well on its own for up to 4 days. When you’re ready to eat, reheat the chicken and quinoa gently, either in the microwave or a covered skillet, then add the cold toppings and sauce fresh, so the finished bowl still has the same contrast of warm and cool components as when it was first assembled. Everything will keep well for 3 to 4 days stored this way.

