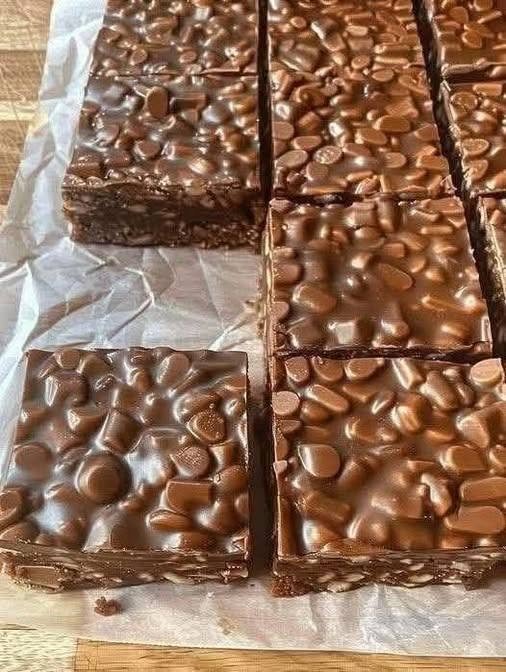
No-Bake Chocolate Peanut Butter Crunch Bars
These No-Bake Chocolate Peanut Butter Crunch Bars are an easy homemade treat made with a creamy peanut butter mixture, crunchy cereal, and a smooth layer of chocolate. They have a satisfying combination of creamy, crispy, and chocolatey textures, and the best part is that there is no oven required.
When you want something sweet but do not want to spend a lot of time baking, these bars are a simple option. Everything comes together in one bowl or saucepan, then the mixture is pressed into a pan and chilled until firm.
The combination of peanut butter and chocolate is always a favorite, but the crunchy texture makes these bars especially enjoyable. They are great for an afternoon snack, lunchbox treat, dessert, or something sweet to keep in the refrigerator for busy days.
Why You’ll Love These Crunch Bars
There are several reasons these bars are worth making.
First, there is no baking involved. You simply prepare the peanut butter mixture, combine it with the crunchy ingredients, press everything into a pan, and let it chill.
Second, the recipe uses simple ingredients that are easy to find. You do not need complicated baking equipment or special decorating skills.
The texture is another reason these bars stand out. The peanut butter mixture gives the base a rich and creamy flavor, while the crunchy cereal adds a light crispness. A layer of melted chocolate on top finishes everything with a smooth chocolate coating.
You can also customize the recipe depending on what you have in your pantry.
Ingredients
For the bars:
- 1 cup creamy peanut butter
- ½ cup honey
- ¼ cup unsalted butter
- 1 teaspoon vanilla extract
- 3 cups crispy rice cereal
- ½ cup finely chopped peanuts
- ¼ teaspoon salt
For the chocolate topping:
- 1 ½ cups semi-sweet chocolate chips
- 1 tablespoon creamy peanut butter
- 1 teaspoon coconut oil, optional
For finishing:
- 2 tablespoons finely chopped peanuts, optional
- A small pinch of flaky sea salt, optional
Choosing the Ingredients
For the best texture, use a creamy peanut butter that mixes easily. Natural peanut butter can also work, but if it has a lot of separated oil, stir it very well before measuring.
Honey adds sweetness and helps bind the mixture together. If you prefer a slightly less sweet bar, you can reduce the amount slightly, although the bars may be a little softer.
Crispy rice cereal provides the crunch. Make sure the cereal stays crisp and is not stale.
Semi-sweet chocolate gives the topping a balanced flavor. If you prefer a sweeter dessert, milk chocolate can be used instead.
If you need this recipe to be gluten-free, check the labels of all packaged ingredients and choose products specifically labeled gluten-free where necessary.
How to Make No-Bake Chocolate Peanut Butter Crunch Bars
1. Prepare the Pan
Start by lining an 8×8-inch square baking pan with parchment paper.
Leave some parchment paper hanging over two sides of the pan. This makes it much easier to lift the chilled bars out later.
Lightly grease the parchment if desired.
Set the pan aside while you prepare the peanut butter mixture.
2. Make the Peanut Butter Mixture
Add the peanut butter, honey, and butter to a medium saucepan.
Place the saucepan over low heat and stir gently until the butter melts and everything becomes smooth.
Do not bring the mixture to a boil. You only need enough heat to melt the ingredients and combine them.
Once smooth, remove the saucepan from the heat.
Stir in the vanilla extract and salt.
The mixture should be glossy and smooth.
3. Add the Crunch
Place the crispy rice cereal and chopped peanuts in a large mixing bowl.
Pour the warm peanut butter mixture over the cereal.
Using a large spoon or spatula, gently fold everything together.
Try not to crush the cereal too much. The goal is to coat the cereal while keeping as much of the crunch as possible.
Continue mixing until the peanut butter mixture is distributed throughout.
4. Press Into the Pan
Transfer the mixture into the prepared baking pan.
Use the back of a spatula, spoon, or the bottom of a measuring cup to press it down firmly and evenly.
Take your time with this step. Pressing the mixture firmly helps the bars hold together when sliced.
Pay special attention to the corners and edges.
Once the surface is even, place the pan in the refrigerator while you prepare the chocolate topping.
5. Melt the Chocolate
Add the chocolate chips and one tablespoon of peanut butter to a microwave-safe bowl.
Heat in short intervals of about 20–30 seconds, stirring well between each interval.
Continue until the chocolate is smooth.
If desired, add one teaspoon of coconut oil. This can make the chocolate topping smoother and easier to spread.
Be careful not to overheat the chocolate. Chocolate can become thick or grainy if overheated.
You can also melt the chocolate using a double boiler over gently simmering water.
6. Add the Chocolate Layer
Remove the chilled peanut butter mixture from the refrigerator.
Pour the melted chocolate over the top.
Use a spatula to spread the chocolate into an even layer.
If you like extra crunch, sprinkle chopped peanuts over the chocolate before it sets.
A tiny pinch of flaky sea salt can also add a nice contrast to the sweet chocolate and peanut butter.
7. Chill Until Firm
Place the pan back into the refrigerator.
Chill for at least 2 hours, or until the bars are firm enough to cut cleanly.
If you are in a hurry, you can place the pan in the freezer for approximately 30–45 minutes, but keep an eye on it so the chocolate does not become unnecessarily hard.
The bars should feel firm when gently pressed.
How to Cut the Bars
Once completely chilled, lift the entire slab from the pan using the parchment paper.
Place it on a cutting board.
For cleaner cuts, use a sharp knife. If the chocolate feels very hard, allow the bars to sit at room temperature for a few minutes before slicing.
Cut into squares or rectangular bars depending on the size you prefer.
For snack-sized pieces, cut the slab into smaller squares.
Tips for the Best Results
Press the mixture firmly.
This is one of the most important steps. A firmly packed base is much less likely to crumble when sliced.
Keep the heat low.
The peanut butter, honey, and butter only need to warm enough to combine. Avoid boiling the mixture.
Do not overmix the cereal.
Gentle folding helps preserve the crispy texture.
Let the bars chill completely.
Cutting them too early can cause the bars to fall apart or make the chocolate topping smear.
Use parchment paper.
It makes removing the finished bars much easier.
Choose the chocolate you enjoy.
Semi-sweet, dark, or milk chocolate can all work depending on your preferred flavor.
Easy Variations
These bars are easy to customize.
For extra chocolate flavor, add a handful of mini chocolate chips to the peanut butter mixture after it has cooled slightly.
For more crunch, replace some of the chopped peanuts with chopped almonds or another nut you enjoy.
You can add shredded coconut for a slightly different texture.
A small amount of cinnamon can also add warmth to the peanut butter mixture.
If you like salty-sweet desserts, sprinkle a little flaky sea salt over the chocolate topping before it sets.
For a stronger peanut butter flavor, swirl a few teaspoons of melted peanut butter over the chocolate layer before refrigerating.
Storage
Store the finished bars in an airtight container in the refrigerator.
They should keep well for several days when properly refrigerated.
Because the chocolate topping can soften at room temperature, keeping the bars chilled helps them maintain their shape and texture.
You can also freeze the bars for longer storage. Place parchment paper between layers so they do not stick together.
When you want one, simply remove a bar from the freezer and allow it to soften slightly before eating.
What to Serve With Them
These bars are delicious on their own, but they can also be served as part of a dessert plate.
Pair one with fresh berries, sliced banana, or a cup of coffee or tea.
For a simple dessert, cut the bars into smaller pieces and serve them alongside fresh fruit.
They also make a convenient homemade snack for busy afternoons.
Frequently Asked Questions
Can I use crunchy peanut butter?
Yes. Crunchy peanut butter works well if you want even more texture. Just remember that the recipe already contains crispy cereal and chopped peanuts, so the finished bars will be quite crunchy.
Can I use dark chocolate?
Absolutely. Dark chocolate works especially well if you prefer a less sweet flavor.
Why are my bars falling apart?
The mixture may not have been pressed firmly enough into the pan, or the bars may not have chilled long enough. Make sure the base is packed tightly and allow it to become completely firm before cutting.
Can I make them ahead?
Yes. These bars are convenient to prepare ahead of time. Keep them refrigerated until you are ready to serve them.
Final Thoughts
No-Bake Chocolate Peanut Butter Crunch Bars are a simple homemade treat with plenty of texture and flavor. The creamy peanut butter base, crispy cereal, chopped peanuts, and smooth chocolate topping come together without turning on the oven.
They are easy enough for a quick afternoon project and versatile enough to customize with different chocolates, nuts, or toppings.
Keep them chilled, cut them into your preferred size, and enjoy them whenever you want a crunchy chocolate peanut butter treat.

