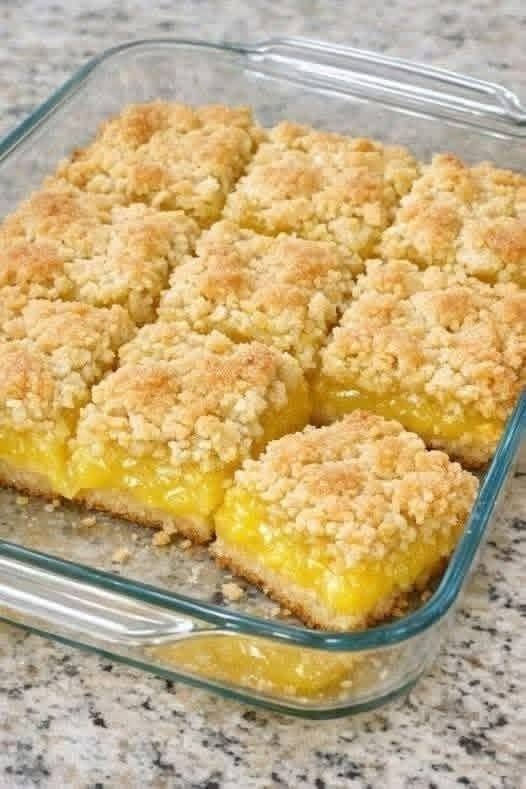
There’s something irresistible about the contrast in a good lemon crumble bar: a buttery, golden crumb topping giving way to a bright, tangy lemon layer underneath, all sitting on a tender shortbread crust. These Gluten-Free Lemon Crumble Bars have exactly that structure, three distinct layers in every square, and they look just as good on a dessert table as they taste. Unlike a plain lemon bar with a smooth top, the crumble topping here adds texture and a slightly toasted, buttery flavor that makes these feel a little more special.
Why the Crumble Topping Makes a Difference
A classic lemon bar is delicious, but it’s essentially two layers: crust and filling, finished with a dusting of powdered sugar. This crumble version adds a third layer that changes the whole experience. The topping bakes into small golden clusters that stay slightly crisp even after the bars have chilled, which means every bite gives you a contrast of textures, a bit of crunch, then the soft, creamy lemon layer, then the tender crust underneath. It also means these bars travel and hold up well for gatherings, since the crumble topping hides any small imperfections in the lemon layer and doesn’t need a delicate powdered-sugar dusting to look finished.
Why This Recipe Is Trickier Than a Plain Lemon Bar
Building three layers instead of two means timing matters more. The crust needs a short pre-bake so it doesn’t turn soggy under the lemon filling. The lemon filling needs to be poured while the crust is still warm so the two layers bond properly, but it can’t be so hot that it starts cooking before it goes in the oven. And the crumble topping needs to be cold and clumpy, not smooth, or it melts into the filling instead of sitting on top and baking into distinct golden pieces. Each layer is simple on its own, but skipping the small details below is what separates a clean, three-layer bar from a mushy one.
Ingredients (Makes 16 Bars)
For the Gluten-Free Crust
- 1½ cups gluten-free all-purpose flour blend
- ⅓ cup powdered sugar
- ½ cup unsalted butter, softened
- ¼ teaspoon salt
- 1 teaspoon vanilla extract
For the Lemon Filling
- 4 large eggs
- 1¼ cups granulated sugar
- ½ cup fresh lemon juice
- 1 tablespoon finely grated lemon zest
- ¼ cup gluten-free all-purpose flour
- ¼ teaspoon baking powder
- Pinch of salt
For the Crumble Topping
- 1 cup gluten-free all-purpose flour blend
- ½ cup old-fashioned gluten-free oats
- ½ cup packed light brown sugar
- ½ teaspoon ground cinnamon, optional
- ¼ teaspoon salt
- ½ cup cold unsalted butter, cut into small cubes
A note on ingredients: keeping the crumble butter cold, straight from the fridge, is what gives you distinct golden clumps rather than a flat, melted layer. If your kitchen is warm, chop the butter and pop it back in the fridge for 10 minutes before mixing the topping. Old-fashioned oats hold their shape better than quick oats and give the crumble a heartier texture, similar to what’s visible in the reference photo.
Step-by-Step Instructions
1. Prepare the pan. Preheat your oven to 350°F (175°C). Line a 9-inch square baking pan with parchment paper, leaving extra hanging over two sides so you can lift the bars out later. Lightly grease the parchment.
2. Make the crust. In a medium bowl, combine the gluten-free flour, powdered sugar and salt. Add the softened butter and vanilla, and mix with a spoon or your hands until it forms a soft, crumbly dough that holds together when pressed.
3. Press and pre-bake the crust. Press the dough firmly and evenly into the bottom of the prepared pan, using the back of a measuring cup to smooth it flat. Bake for 15 to 18 minutes, until the edges are just turning light golden. Remove it from the oven but leave the oven on. The crust should still be warm when the filling goes in.
4. Make the lemon filling. While the crust bakes, whisk the eggs and granulated sugar together in a bowl until smooth. Add the lemon juice and zest and whisk again. Add the gluten-free flour, baking powder and salt, whisking until no lumps remain. Fresh lemon juice makes a real difference here, so avoid bottled juice if you can.
5. Add the filling to the warm crust. Pour the lemon mixture directly over the warm crust, tilting the pan gently so it spreads into an even layer.
6. Make the crumble topping. In a separate bowl, combine the flour, oats, brown sugar, cinnamon if using, and salt. Add the cold, cubed butter. Using your fingertips or a pastry cutter, work the butter into the dry ingredients until the mixture forms small, pea-to-marble-sized clumps. It should look coarse and uneven, not like a smooth paste. Keep it moving quickly so the butter doesn’t soften too much in your hands.
7. Scatter the crumble over the filling. Sprinkle the crumble topping evenly over the lemon layer, breaking up any very large clumps but leaving plenty of texture. Cover the surface generously, right to the edges, so no lemon filling is visible once baked, matching the fully-covered look of a classic crumble bar.
8. Bake. Return the pan to the oven and bake for 30 to 35 minutes, until the crumble topping is deeply golden and the lemon layer looks set around the edges with only a slight jiggle in the very center. If the topping browns too quickly, loosely tent the pan with foil for the last 5 to 10 minutes.
9. Cool completely. Transfer the pan to a wire rack and let the bars cool to room temperature. This can take an hour or more, and rushing this step is the most common reason bars fall apart when sliced.
10. Chill before slicing. Once cooled, refrigerate the bars for at least 1 to 2 hours, or until fully chilled. This firms up the lemon layer so it holds its shape when cut. Lift the whole slab out using the parchment overhang, place it on a cutting board, and slice into 16 squares with a sharp knife, wiping the blade clean between cuts for neat edges.
Tips for Success
Don’t skip pre-baking the crust, since it’s what keeps the bottom from turning soggy under the lemon layer. Keep the crumble butter cold right up until it goes into the dry ingredients, because warm butter blends in smoothly instead of forming the golden clumps that give the topping its texture. Resist checking the bars too early, and instead look for a topping that’s fully golden and a center that only jiggles slightly, since an underbaked center won’t set properly once chilled. Let the bars cool fully before refrigerating, and refrigerate before slicing, since warm or room-temperature lemon filling is too soft to cut cleanly.
Flavor Variations
For a brighter citrus flavor, add an extra teaspoon of lemon zest to the filling. Swap the cinnamon in the crumble for a pinch of ground ginger for a slightly warmer flavor, or leave it out entirely for a more neutral, buttery crumble. A handful of chopped almonds or shredded coconut mixed into the crumble topping also works well if you want a little extra crunch.
Storage
Store the bars in an airtight container in the refrigerator, since the lemon layer needs to stay cool to hold its shape. They keep well for about 4 to 5 days. Separate layers with parchment paper if you’re stacking them in a container, so the crumble topping doesn’t stick to the bar above it.
Can You Freeze These Bars?
Yes. Let the bars cool completely and chill before freezing. Slice them into individual portions, wrap each one tightly, and store them in a freezer-safe container or bag for up to 2 to 3 months. Thaw the bars overnight in the refrigerator before serving. The crumble topping holds up well to freezing and keeps most of its texture once thawed.
Final Thoughts
These Gluten-Free Lemon Crumble Bars take a classic lemon bar and add a buttery, oat-flecked crumble on top, giving you three distinct layers in every bite: a tender crust, a bright lemon filling, and a golden, slightly crisp topping. They take a little more patience than a plain lemon bar, mostly in the form of cooling and chilling time, but the payoff is a dessert that looks bakery-worthy and holds together beautifully when sliced.

