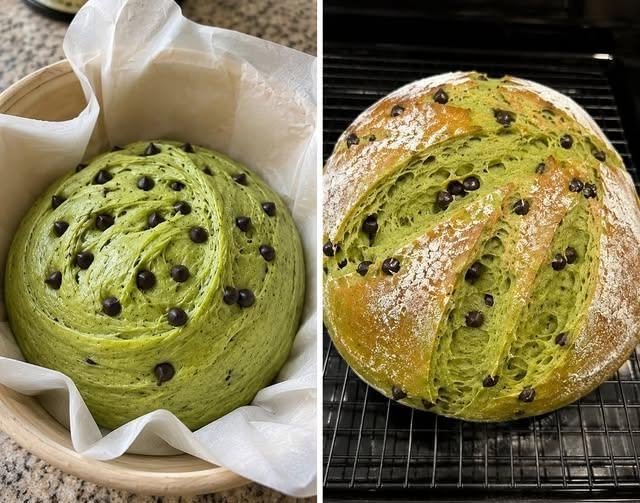
Sourdough Green Bread Loaf
This Sourdough Green Bread Loaf is a beautiful homemade bread with a naturally green color, a soft and slightly chewy crumb, and the delicious tangy flavor that makes sourdough so special. It is a fun way to give a classic sourdough loaf a fresh twist while keeping the recipe simple and approachable.
The green color can be created naturally with fresh spinach, which adds color without making the bread taste strongly like vegetables. The finished loaf is perfect for sandwiches, toast, breakfast, or serving alongside soups and salads.
Ingredients
- 100 g active sourdough starter
- 350 g bread flour
- 100 g fresh spinach
- 250 g water, divided
- 10 g honey or maple syrup, optional
- 8 g fine sea salt
- 15 g olive oil
- Rice flour or bread flour, for dusting
Optional Additions
You can customize the loaf with:
- 1 teaspoon garlic powder
- 1 teaspoon dried Italian herbs
- 1 tablespoon sesame seeds
- 1 tablespoon sunflower seeds
- 1 tablespoon pumpkin seeds
- 1 teaspoon dried rosemary
- A small amount of grated Parmesan for a savory version
Before You Begin
The most important ingredient in sourdough bread is an active sourdough starter. Your starter should be bubbly, active, and able to rise well after feeding.
For the best results, feed your starter several hours before beginning the recipe and use it when it is at or near its peak.
Because sourdough fermentation depends on temperature, your exact rising time may vary. A warm kitchen will usually make the dough ferment faster, while a cooler kitchen can require additional time.
Step 1: Prepare the Green Mixture
Wash the fresh spinach thoroughly and remove any thick stems.
Place the spinach and approximately 150 g of the water into a blender.
Blend until completely smooth. You want a vibrant green liquid without large pieces of spinach remaining.
The spinach puree will provide the natural green color for the bread.
Set the remaining 100 g of water aside. You may not need all of it because spinach contains additional moisture.
Step 2: Mix the Dough
In a large mixing bowl, combine the bread flour and approximately 220–230 g of the spinach-water mixture.
Mix with your hand or a sturdy spoon until the flour is fully hydrated and no dry patches remain.
Cover the bowl and let the mixture rest for approximately 30 minutes.
This resting period allows the flour to absorb the water and helps begin gluten development.
Step 3: Add the Starter
Add the active sourdough starter to the dough.
Add the honey or maple syrup if using, followed by the olive oil.
Mix thoroughly by squeezing and folding the dough with your hands until the starter is evenly incorporated.
The dough may initially feel sticky, but this is normal.
Step 4: Add the Salt
Add the salt and continue mixing.
If the dough feels very stiff, gradually add some of the remaining water.
Add the water slowly rather than all at once. Different flours absorb different amounts of water, and you want a dough that is soft and elastic without becoming excessively wet.
Cover the bowl and let the dough rest for another 20–30 minutes.
Step 5: Stretch and Fold
Instead of kneading the dough aggressively, use a series of stretch-and-fold movements.
With slightly wet hands, grab one side of the dough, gently stretch it upward, and fold it toward the center.
Turn the bowl and repeat on all four sides.
Complete approximately 3–4 rounds of stretch and folds, spacing them about 30 minutes apart.
As the dough develops gluten, it should become smoother, stronger, and easier to handle.
You should notice the dough becoming more elastic after each round.
Step 6: Bulk Fermentation
After completing the stretch-and-fold process, cover the bowl and allow the dough to ferment.
Leave it at room temperature until it becomes noticeably lighter, smoother, and slightly expanded.
Depending on the temperature of your kitchen and the strength of your starter, this can take approximately 4–8 hours.
Do not rely only on the clock. Look at the dough.
The dough should show bubbles around the edges and have increased in volume. It does not necessarily need to double in size.
Over-fermenting can make sourdough dough difficult to shape and may result in a flatter loaf.
Step 7: Shape the Loaf
Lightly flour your work surface.
Gently turn the fermented dough onto the surface.
Try not to remove all of the air that has developed during fermentation.
Shape the dough into a loose round by folding the edges toward the center.
Let it rest for approximately 15–20 minutes.
Then perform the final shaping by creating gentle tension across the surface of the dough.
Place the shaped loaf seam-side up into a well-floured banneton or a bowl lined with a clean kitchen towel.
Step 8: Final Proof
Cover the dough and allow it to proof again.
You can leave it at room temperature for approximately 1–2 hours, depending on how active the dough is.
For a deeper sourdough flavor and easier scoring, you can place the covered dough in the refrigerator overnight.
Cold fermentation can also make the dough easier to handle when you’re ready to bake.
Step 9: Prepare for Baking
When you’re ready to bake, preheat your oven to 450°F (230°C) with a Dutch oven inside.
Allow the Dutch oven to heat for at least 30–45 minutes.
Carefully turn the chilled dough onto a piece of parchment paper.
Dust off any excess flour.
Using a sharp bread lame or razor blade, make one deep slash across the top of the loaf.
You can also create a simple decorative pattern if desired.
Step 10: Bake the Sourdough Green Bread
Carefully place the dough into the hot Dutch oven.
Cover with the lid and bake for approximately 20 minutes.
Then remove the lid and continue baking for another 20–25 minutes, or until the crust is beautifully browned.
Because the loaf contains spinach, the crust may develop a slightly different color than traditional sourdough.
If the top is browning too quickly, reduce the oven temperature slightly during the final part of baking.
Step 11: Cool Completely
Remove the bread from the Dutch oven and place it on a wire rack.
Allow it to cool completely before slicing.
This step is important because the inside of the loaf continues to set as it cools.
Cutting into the bread while it is still very hot can result in a gummy or compressed crumb.
Once cooled, slice the loaf with a serrated bread knife.
The inside should have a beautiful green tint with a soft, chewy sourdough texture.
How to Serve Sourdough Green Bread
There are many ways to enjoy this colorful homemade loaf.
Breakfast Toast
Toast a slice and top it with butter, avocado, cottage cheese, or a fried egg.
Sandwiches
Use two slices to make a colorful sandwich with turkey, chicken, cheese, lettuce, tomatoes, or your favorite vegetables.
Garlic Toast
Brush slices with olive oil, add garlic and herbs, and toast until crisp.
Soup Companion
Serve thick slices alongside tomato soup, vegetable soup, or creamy chicken soup.
Avocado Toast
The green color of the bread makes it especially attractive with mashed avocado, chili flakes, and a little lemon juice.
Tips for Success
Use an active starter: A weak starter may result in a dense loaf.
Don’t add all the water immediately: The spinach puree already contributes moisture.
Watch the dough rather than the clock: Fermentation times vary depending on temperature and starter activity.
Don’t skip the stretch and folds: They help develop strength and structure.
Use a hot Dutch oven: Steam trapped inside the covered pot helps create a beautiful crust and good oven spring.
Let the bread cool: Patience gives you a better crumb and cleaner slices.
Storage
Store the cooled loaf at room temperature in a bread bag or wrapped in a clean kitchen towel.
For the best texture, enjoy it within several days.
You can also slice the loaf and freeze the slices in an airtight freezer-safe bag. Toast individual slices directly from frozen whenever you want fresh homemade sourdough.
Final Thoughts
This Sourdough Green Bread Loaf is a fun and naturally colorful variation on traditional sourdough bread. Fresh spinach gives the loaf its beautiful green appearance while the sourdough starter provides the familiar tangy flavor and chewy texture.
It is perfect for anyone who enjoys baking homemade bread and wants to create something a little different. Serve it for breakfast, turn it into sandwiches, make avocado toast, or simply enjoy a warm slice with butter.
With an active starter, good-quality bread flour, patience, and proper fermentation, you can create a beautiful homemade green sourdough loaf with a crisp crust and soft interior right in your own kitchen.

