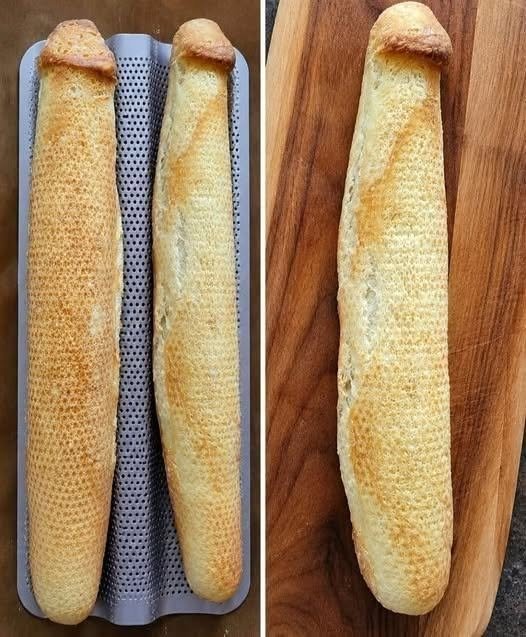
There is something special about making French baguettes at home, especially when you use a sourdough starter. The crust becomes beautifully crisp, while the inside stays light, chewy, and full of flavor. These Homemade Sourdough French Baguettes take a little patience, but most of the work is done by time rather than complicated techniques.
This recipe is a great way to use an active sourdough starter and make bakery-style bread with simple ingredients. You do not need a mixer or special bread machine. With flour, water, sourdough starter, salt, and a little time, you can make baguettes that are perfect for breakfast, sandwiches, soups, or simply enjoying warm with butter.
Why You Will Love These Sourdough Baguettes
These baguettes have a thin, crisp crust and a soft, chewy center. The sourdough fermentation gives them a mild tangy flavor that becomes more noticeable as the dough ferments.
The recipe is also flexible. You can prepare the dough during the day and bake it later, or use an overnight fermentation to make the process easier.
The most important thing is not to rush the dough. Sourdough needs time to ferment and develop its structure and flavor.
Ingredients
- 100g active sourdough starter, bubbly and recently fed
- 350g lukewarm water
- 500g bread flour
- 10g salt
- A little rice flour or bread flour for shaping
- Extra flour for the work surface
For baking:
- A baking stone or heavy baking sheet
- Parchment paper
- Ice cubes or hot water for creating steam
Before You Start
Make sure your sourdough starter is active before beginning. A healthy starter should look bubbly and have increased noticeably in volume after feeding.
If your starter is weak or has been sitting in the refrigerator for a long time, give it one or two feedings before making the dough.
The temperature of your kitchen will also affect fermentation. A warm kitchen may make the dough rise faster, while a cool kitchen can significantly slow it down.
Instead of following the clock alone, look at the dough. It should become lighter, smoother, and noticeably expanded during fermentation.
Step 1: Mix the Dough
Add the active sourdough starter and lukewarm water to a large mixing bowl. Stir until the starter is mostly dissolved.
Add the bread flour and mix with a wooden spoon or your hands until no large patches of dry flour remain.
The dough may look rough and sticky at this stage. That is completely normal.
Cover the bowl and let the dough rest for about 30 minutes.
This resting period allows the flour to absorb the water and makes the dough easier to develop later.
Step 2: Add the Salt
After the initial rest, sprinkle the salt over the dough.
Wet your hand slightly and gently work the salt into the dough. You can pinch and fold the dough several times until the salt is evenly distributed.
Cover the bowl again and let the dough rest.
Step 3: Build Strength With Stretch and Folds
During the first few hours of bulk fermentation, perform a series of stretch-and-folds.
To do this, grab one side of the dough, gently stretch it upward without tearing it, and fold it over the center. Turn the bowl and repeat on the other sides.
Do about 3 to 4 sets of folds, spaced approximately 30 minutes apart.
As you continue, you should notice that the dough becomes smoother and stronger. It may also begin to hold its shape better.
After the final fold, cover the bowl and allow the dough to continue fermenting.
Step 4: Bulk Fermentation
Let the dough ferment until it becomes noticeably puffy and increases in volume.
Depending on your starter, flour, and kitchen temperature, this may take approximately 4 to 7 hours.
Do not worry if your dough does not exactly double in size. Sourdough baguette dough is often ready when it has expanded significantly and contains visible bubbles.
If your kitchen is cool, fermentation may take longer.
If the dough looks very dense and has not changed much, give it more time.
Step 5: Divide the Dough
Lightly flour your work surface.
Gently turn the fermented dough out onto the surface. Try not to press all the air out.
Divide the dough into three roughly equal portions.
Shape each portion gently into a loose rectangle or log.
Cover the pieces with a clean kitchen towel and let them rest for about 15 to 20 minutes.
This short rest allows the gluten to relax and makes shaping easier.
Step 6: Shape the Baguettes
Take one piece of dough and gently flatten it into a rectangle.
Fold the top portion toward the center and press lightly. Fold again and gently seal the seam.
Continue rolling the dough into a long baguette shape.
Aim for a baguette approximately 12 to 14 inches long, depending on the size of your baking surface.
Try to keep the thickness fairly even from end to end.
Repeat with the remaining pieces of dough.
Place the shaped baguettes seam-side down on parchment paper or a lightly floured baguette couche.
Cover them loosely and let them proof.
Step 7: Final Proof
Allow the shaped baguettes to rest for approximately 1 to 2 hours at room temperature.
The exact time will depend on the temperature of your kitchen and the strength of your sourdough starter.
The baguettes should look slightly puffy but should still have enough strength to hold their shape.
For extra flavor, you can also refrigerate the shaped baguettes for several hours or overnight and bake them the next day.
Cold dough is often easier to score and can develop excellent flavor during the extended fermentation.
Step 8: Preheat the Oven
About 30 to 45 minutes before baking, preheat your oven to 475°F (245°C).
If you have a baking stone or baking steel, place it in the oven while it preheats.
Steam is important for achieving a crisp baguette crust. Place a heavy metal pan on a lower oven rack while the oven heats.
Be very careful when adding hot water later because the steam will be extremely hot.
Step 9: Score the Baguettes
When the baguettes are ready to bake, gently transfer them to parchment paper or your preheated baking surface.
Using a sharp bread lame or razor blade, make several quick diagonal cuts along the top of each baguette.
The cuts should be slightly angled and overlap a little.
Scoring gives the bread room to expand during baking and creates the classic French baguette appearance.
Try to make the cuts confidently rather than slowly dragging the blade through the dough.
Step 10: Bake With Steam
Place the baguettes in the preheated oven.
Immediately add a few ice cubes to the preheated steam pan or carefully pour a small amount of hot water into the pan.
Close the oven door quickly to trap the steam.
Bake at 475°F (245°C) for about 10 minutes with steam.
Then carefully remove the steam pan if possible and reduce the oven temperature to 450°F (230°C).
Continue baking for another 15 to 20 minutes, or until the baguettes are deeply golden brown and the crust looks crisp.
For an extra crisp crust, turn off the oven and leave the baguettes inside with the oven door slightly open for about 5 minutes.
Step 11: Cool Before Slicing
Remove the baguettes from the oven and place them on a wire rack.
Allow them to cool for at least 30 to 45 minutes before slicing.
It can be tempting to cut into a hot baguette immediately, but allowing it to cool gives the interior time to finish setting.
Once cooled, slice with a serrated bread knife.
The finished baguettes should have a crisp crust, a light chewy crumb, and small irregular holes throughout the inside.
Tips for Successful Sourdough Baguettes
Use an active starter: Your starter should be bubbly and strong enough to properly ferment the dough.
Watch the dough, not just the clock: Fermentation times vary depending on temperature and starter strength.
Do not add too much flour: The dough should be somewhat sticky. Adding excessive flour can make the baguettes dense.
Handle the dough gently: Try to preserve the air developed during fermentation.
Preheat properly: A fully heated oven and baking surface help create better oven spring.
Use steam: Steam keeps the crust flexible during the first part of baking, allowing the baguettes to expand before the crust sets.
Do not skip the cooling period: Cooling helps the crumb develop the right texture.
How to Store Sourdough Baguettes
Homemade baguettes are best eaten on the same day because the crust is at its crispest when fresh.
If you have leftovers, store them at room temperature in a paper bag or loosely wrapped kitchen towel.
Avoid storing baguettes in the refrigerator because the cold environment can make the bread stale more quickly.
For longer storage, allow the baguettes to cool completely, wrap them well, and freeze them.
When ready to eat, thaw at room temperature and warm them in a hot oven for several minutes to refresh the crust.
Serving Ideas
These sourdough baguettes are delicious served simply with butter, but there are many other ways to enjoy them.
Slice them for sandwiches, serve them alongside soup, use them for garlic bread, or toast slices with olive oil and toppings.
They are also perfect for breakfast with butter and jam or as a simple side for pasta and roasted vegetables.
Final Thoughts
Making Homemade Sourdough French Baguettes takes patience, but the result is worth the effort. The combination of a crisp golden crust, chewy center, and naturally fermented flavor makes these baguettes a wonderful homemade bread project.
Once you become familiar with the dough, fermentation, shaping, and baking process, you can adjust the timing to suit your kitchen and schedule. With an active sourdough starter and a little practice, you can make fresh baguettes at home that are perfect for sharing at the table.

