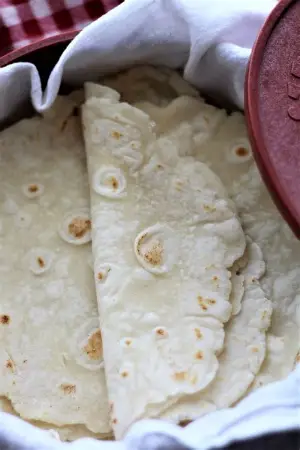
There’s something deeply satisfying about pulling a warm, soft tortilla off your own stovetop, especially when you’re gluten-free and have spent years settling for store-bought versions that crack, dry out, or taste more like cardboard than bread. These homemade gluten-free tortillas change that completely. Made from simple pantry staples and cooked fresh in your own kitchen, they come out soft, pliable, and genuinely foldable — perfect for tacos, wraps, quesadillas, or even a quick breakfast rolled with eggs and cheese.
Why Homemade Makes All the Difference
Store-bought gluten-free tortillas almost always contain a long list of stabilizers, gums, and preservatives to survive weeks on a shelf, and that trade-off usually comes at the cost of texture and flavor. When you make tortillas at home, you control exactly what goes in, and you can taste the difference immediately — these are softer, more flexible, and taste like an actual tortilla rather than a flat, gluten-free approximation of one. Homemade also means you can make a fresh batch in under an hour, cook only what you need, and freeze the rest for busy weeknights.
Why Gluten-Free Tortillas Are Trickier Than They Look
Traditional flour tortillas rely on gluten for two things: elasticity, so the dough rolls thin without tearing, and chew, which gives tortillas their soft, slightly stretchy bite. Without gluten, both qualities have to come from elsewhere. This recipe solves elasticity with a gluten-free flour blend that already contains xanthan gum, paired with tapioca starch, which brings its own natural stretchiness. The chew comes down to proper hydration — gluten-free flours absorb water far more slowly than wheat flour, which is why the resting step here is non-negotiable. Skipping it is the number one reason homemade gluten-free tortillas end up cracking.
Ingredients (Makes 8 Tortillas)
- 2 cups gluten-free all-purpose flour blend (with xanthan gum)
- ½ cup tapioca starch
- 1 teaspoon baking powder
- ¾ teaspoon fine sea salt
- 3 tablespoons olive oil or melted butter
- ¾ cup warm water, plus more as needed
- 1 teaspoon apple cider vinegar
A note on ingredients: tapioca starch is doing real work here, not just bulking things up. It’s what gives these tortillas their pliable, slightly stretchy quality once warm, which is exactly the texture most gluten-free tortillas are missing. Don’t swap it out for more of the flour blend — the two starches each serve a different purpose in the dough.
Step-by-Step Instructions
1. Whisk the dry ingredients. In a large bowl, whisk together the gluten-free flour blend, tapioca starch, baking powder, and salt until fully combined, with no lumps or pockets of starch left behind.
2. Cut in the oil. Add the olive oil or melted butter to the dry ingredients and work it in with a fork or your fingertips until the mixture resembles coarse, sandy crumbs — similar to the first stage of making a homemade pie crust. This coats the flour in fat before the liquid is added, keeping the finished tortillas tender rather than tough.
3. Add the liquid and form a dough. Stir the apple cider vinegar into the warm water, then pour it into the flour mixture gradually, stirring with a spatula or your hands as you go. Keep mixing until a soft, slightly tacky dough comes together. If it feels dry or won’t hold, add a splash more warm water, one tablespoon at a time, until it does.
4. Knead briefly. Turn the dough out onto a clean surface and knead gently for about a minute, just until smooth. You’re aiming for a texture like soft Play-Doh — not sticky, not crumbly.
5. Divide and rest the dough. Divide the dough into 8 equal pieces and roll each into a smooth ball. Cover with a clean towel or plastic wrap and let rest for 15 to 20 minutes at room temperature. This resting period is genuinely essential at home — it gives the gluten-free flours time to fully absorb the liquid, which is what keeps the tortillas from cracking once you roll and cook them.
6. Roll out the tortillas. Place one dough ball between two sheets of parchment paper and roll it out into a thin circle, about 7 to 8 inches across, using a rolling pin. Give the dough a quarter turn every few rolls to keep the shape even rather than oblong. Repeat with the remaining balls, keeping the ones you haven’t rolled yet covered so they don’t dry out. Rolling between parchment rather than directly on a floured counter matters a lot here, since gluten-free dough is more delicate and prone to sticking without gluten’s natural stretch to rely on.
7. Cook the first side. Heat a dry, ungreased skillet or griddle over medium-high heat until properly hot — a drop of water flicked onto the surface should sizzle right away. Carefully peel one tortilla off the parchment and lay it in the skillet. Cook for 45 to 60 seconds, until small golden-brown spots appear on the underside and the edges start to look set.
8. Cook the second side. Flip the tortilla and cook the second side for another 30 to 45 seconds, until it puffs slightly in a few spots and is lightly speckled with golden-brown marks, just like a good wheat-based tortilla straight off a home stovetop. Repeat with the remaining tortillas, keeping the skillet dry and hot throughout — no oil needed in the pan, since the tortillas already have fat worked into the dough itself.
9. Keep warm and soft. As each tortilla finishes cooking, stack them under a clean kitchen towel. The trapped steam keeps every tortilla soft and pliable while the rest cook, rather than letting them stiffen up on an open plate.
Tips for Homemade Success
A few small habits make the biggest difference between tortillas that crack and ones that fold like a dream. Don’t rush the resting step — a few extra minutes beyond the minimum helps if your kitchen runs cool, since gluten-free flours hydrate more slowly in colder conditions. Always cook in a completely dry skillet rather than an oiled one, since oil tends to fry the surface instead of gently toasting it, turning soft tortillas crisp and brittle. And work with the dough while it’s fresh — if it sits too long after rolling and the edges start to dry out, those are exactly the spots most likely to crack during cooking.
Storage and Reheating
Homemade tortillas keep well wrapped in foil at room temperature for about a day, or in the refrigerator for up to 5 days. For longer storage, freeze them with a small piece of parchment between each one so they don’t stick together, and they’ll keep for up to 2 months. To reheat, warm briefly in a dry skillet on each side, or wrap in a slightly damp paper towel and microwave for 20 to 30 seconds — both bring back that soft, foldable, fresh-off-the-stove texture, even straight from frozen.

