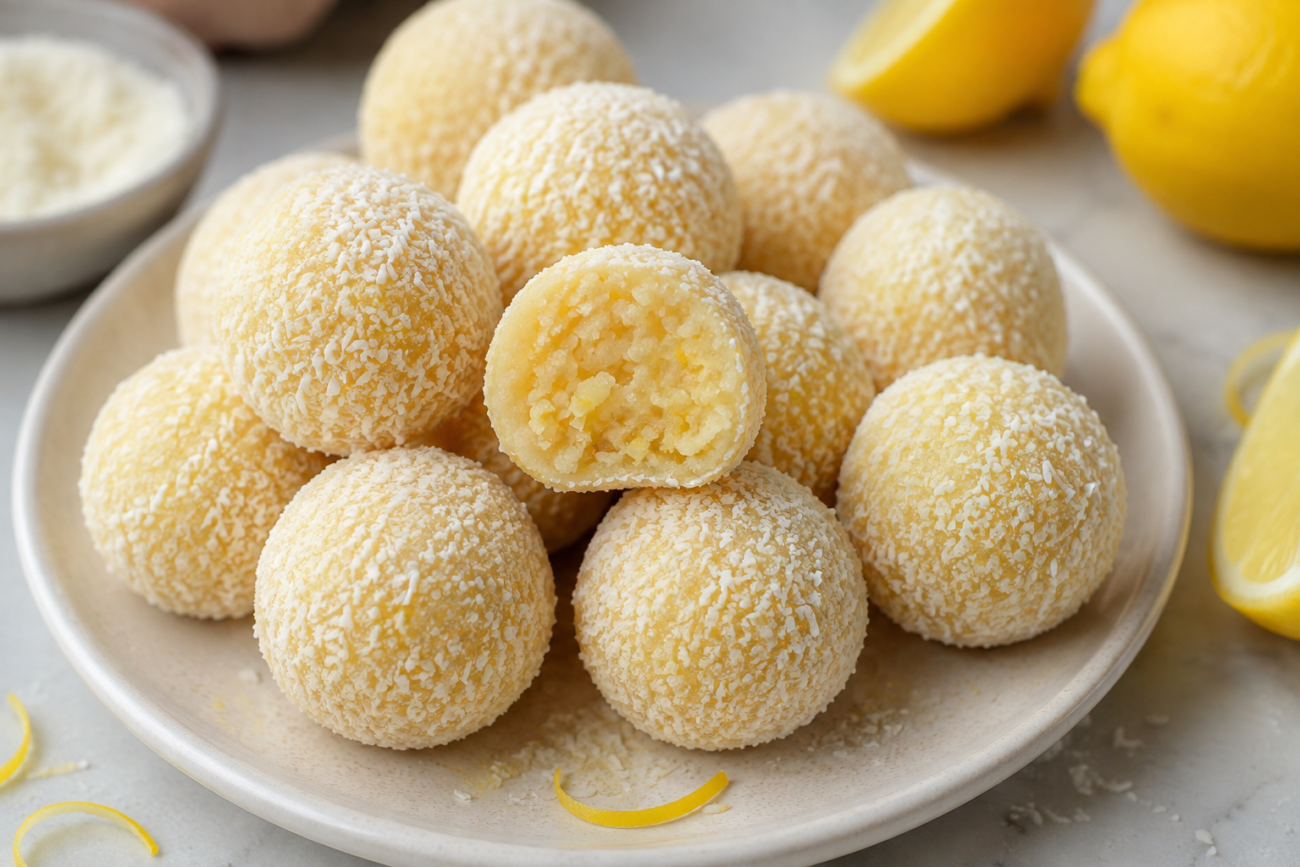
These Gluten-Free Lemon Truffles are a bright, creamy, and delicious no-bake treat made with simple ingredients. They have a refreshing lemon flavor, a soft texture, and a delicate coconut coating that makes every bite feel special.
They are perfect for afternoon tea, parties, holidays, dessert platters, homemade gifts, or simply when you want a quick sweet treat without turning on the oven.
The recipe is easy to prepare and can be made in one bowl. The most important thing when making these for a gluten-free diet is choosing certified gluten-free biscuits or cookies and checking all packaged ingredients carefully.
Ingredients
- 200 g gluten-free plain sweet biscuits
- 100 g desiccated coconut
- 395 g sweetened condensed milk
- 2 tablespoons fresh lemon juice
- Finely grated zest of 1–2 lemons
- 1 teaspoon vanilla extract
- Extra desiccated coconut, for coating
Optional Ingredients
- 1 tablespoon finely grated lemon zest for extra flavor
- 50 g gluten-free white chocolate, melted, for drizzling
- 1 tablespoon freeze-dried raspberry powder for decoration
Why You’ll Love These Lemon Truffles
These little truffles are:
- Gluten-free when suitable certified ingredients are used
- No-bake
- Easy to prepare
- Bright and refreshing
- Soft and creamy inside
- Perfect for entertaining
- Easy to make ahead
- Great for dessert platters
- Suitable for homemade edible gifts
The combination of sweet condensed milk, tangy lemon, coconut, and biscuit crumbs creates a balanced dessert that is rich without requiring complicated baking.
Choosing Gluten-Free Ingredients
If you are making these truffles for someone with celiac disease or a strict gluten-free requirement, ingredient selection is especially important.
Choose biscuits that are clearly labeled gluten-free. Don’t assume that plain-looking biscuits are automatically gluten-free.
Check the labels of the condensed milk, vanilla extract, coconut, chocolate, and any other packaged ingredients you use.
Also consider cross-contact during preparation. Use clean bowls, utensils, cutting boards, and storage containers that have not been contaminated with regular wheat-based products.
Preparing the Lemon
Wash the lemons well and dry them.
Using a fine grater, grate only the yellow outer layer of the skin.
Avoid grating too deeply into the white part because the pith can have a bitter taste.
Juice the lemons and measure approximately 2 tablespoons.
Fresh lemon juice gives these truffles a much brighter flavor than bottled lemon juice.
Set the zest and juice aside while preparing the biscuit mixture.
Crushing the Biscuits
Place the gluten-free biscuits into a food processor.
Pulse several times until they become fine crumbs.
You don’t want large pieces because they can make the truffles difficult to shape.
However, avoid processing for too long if the biscuits start turning into a paste.
If you don’t have a food processor, place the biscuits into a strong resealable bag and crush them using a rolling pin.
Make sure the crumbs are relatively fine and evenly sized.
Combining the Dry Ingredients
Place the crushed gluten-free biscuits into a large mixing bowl.
Add the desiccated coconut and lemon zest.
Stir well to distribute the coconut and lemon evenly throughout the biscuit crumbs.
At this stage, you should already notice a fresh lemon aroma.
Adding the Wet Ingredients
Pour the sweetened condensed milk into the bowl.
Add the fresh lemon juice and vanilla extract.
Using a sturdy spoon or spatula, mix everything together until a thick, sticky mixture forms.
The mixture should be moist enough to hold together when pressed but not so wet that it becomes impossible to roll.
If it seems too dry, add a small amount of condensed milk.
If it seems too sticky, add a little extra desiccated coconut or gluten-free biscuit crumbs.
Make small adjustments rather than adding large amounts at once.
Chilling the Mixture
Cover the bowl and place it in the refrigerator for approximately 30–60 minutes.
This step is important because the mixture becomes firmer as it chills.
A chilled mixture is much easier to handle and roll into neat little balls.
If your kitchen is particularly warm, you may want to chill it for slightly longer.
Rolling the Truffles
Once the mixture has chilled, line a tray or plate with parchment paper.
Use a teaspoon or small cookie scoop to portion the mixture.
Roll each portion gently between your palms until it forms a smooth ball.
Try to keep the truffles approximately the same size so they look consistent when served.
Place each finished truffle on the prepared tray.
Continue until all the mixture has been used.
Depending on the size you make, this recipe should produce approximately 20–24 truffles.
Coating the Truffles
Place extra desiccated coconut into a shallow bowl.
Roll each truffle through the coconut until completely coated.
Gently press the coconut onto the surface if necessary.
The white coconut coating gives the truffles a beautiful finish and adds a pleasant texture.
For a more decorative appearance, you can add a tiny amount of lemon zest to the coconut before coating.
Optional White Chocolate Decoration
For a more elegant presentation, melt a small amount of gluten-free white chocolate.
Drizzle thin lines of melted chocolate over the chilled truffles.
Allow the chocolate to set before serving.
You can also sprinkle a tiny amount of lemon zest or freeze-dried raspberry powder over the chocolate before it hardens.
Chilling Before Serving
Once the truffles are coated, place them back into the refrigerator for another 20–30 minutes.
This allows them to firm up and makes them easier to serve.
They can be served chilled or allowed to sit at room temperature for a few minutes before eating.
Storage
Store the finished lemon truffles in an airtight container in the refrigerator.
For the best quality, enjoy them within approximately 5 days, depending on the freshness of your ingredients.
Place parchment paper between layers if necessary to prevent the coconut coating from sticking.
The truffles can also be frozen in a suitable airtight freezer container.
When ready to eat, transfer them to the refrigerator and allow them to thaw gradually.
Tips for Perfect Lemon Truffles
Use Fresh Lemons
Fresh lemon zest provides much more fragrance than bottled flavoring.
Don’t Add Too Much Juice
Although lemon juice adds wonderful flavor, too much liquid can make the mixture too soft.
Start with the recommended amount and adjust only if necessary.
Chill Before Rolling
A chilled mixture is easier to handle and produces smoother truffles.
Keep Your Hands Lightly Clean
If the mixture begins sticking to your hands while rolling, wash and dry your hands between batches.
You can also chill the mixture for a little longer.
Use Fine Biscuit Crumbs
Fine crumbs create a smoother, more consistent truffle texture.
Flavor Variations
Lemon Coconut Truffles
Add extra coconut to the mixture for a stronger coconut flavor.
Lemon Raspberry Truffles
Add a little freeze-dried raspberry powder to the mixture or use it as a decorative coating.
Lemon White Chocolate Truffles
Drizzle the finished truffles with gluten-free white chocolate for a richer dessert.
Lime Truffles
Replace some or all of the lemon zest and juice with fresh lime for a bright citrus variation.
Orange Truffles
Use fresh orange zest and juice instead of lemon for a softer, sweeter citrus flavor.
Serving Suggestions
These truffles are ideal for a variety of occasions.
Arrange them on a dessert platter with fresh lemon slices and berries.
Serve them alongside coffee or tea during afternoon gatherings.
They also make a lovely addition to birthday parties, holiday celebrations, bridal showers, and other special occasions.
For homemade gifts, place the truffles into small food-safe boxes or jars and keep them refrigerated until ready to give.
Frequently Asked Questions
Are these lemon truffles gluten-free?
Yes, they can be gluten-free when you use certified gluten-free biscuits and other suitable ingredients. Always check ingredient labels and consider cross-contact during preparation.
Can I make these without coconut?
Yes, although coconut helps provide texture and flavor. You can replace some of it with additional gluten-free biscuit crumbs if necessary.
Can I use bottled lemon juice?
You can, but fresh lemon juice is recommended for the best flavor.
Can I make these dairy-free?
Traditional condensed milk contains dairy, so the standard recipe is not dairy-free. A suitable dairy-free condensed milk alternative may work, but the texture and sweetness can vary.
Can children help make these?
Yes. Since this is a no-bake recipe, children can help roll and coat the truffles with appropriate supervision.
Can I make them ahead of time?
Absolutely. They are an excellent make-ahead dessert and can be stored in the refrigerator until you’re ready to serve them.
Final Thoughts
These Gluten-Free Lemon Truffles are proof that a simple no-bake recipe can create an impressive homemade dessert.
The bright lemon flavor balances the sweetness of condensed milk, while gluten-free biscuit crumbs and coconut create a soft, satisfying texture.
They’re easy enough for a weekday treat but pretty enough for celebrations and dessert tables.
The recipe is also highly customizable. You can keep the truffles simple with a coconut coating or dress them up with white chocolate, lemon zest, berries, or other gluten-free decorations.
Most importantly, if you’re preparing these for someone following a strict gluten-free diet, carefully check every packaged ingredient and avoid cross-contact during preparation.
Prep Time: 15 minutes
Chilling Time: 1–1½ hours
Total Time: About 1½ hours
Yield: 20–24 truffles
Difficulty: Easy
Type: No-Bake Dessert
Diet: Gluten-Free when suitable certified ingredients are used

