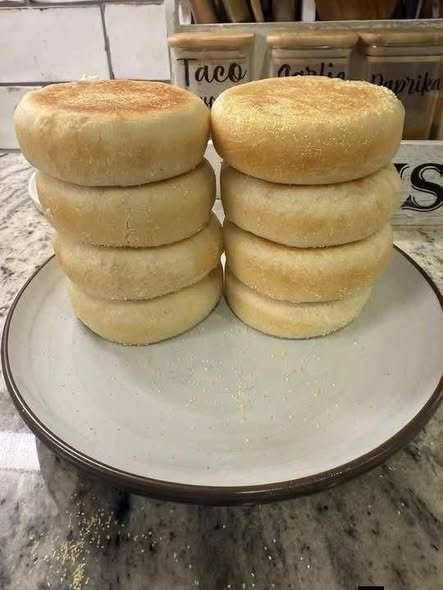
Homemade gluten-free English muffins are soft, lightly chewy, and perfect for breakfast. If you are following a gluten-free diet and miss the classic English muffins from the bakery, this easy homemade recipe is a great option to keep in your kitchen.
These muffins are cooked on a skillet rather than baked in the oven, giving them a lightly golden outside while keeping the inside soft. Once toasted, they develop crisp edges and warm, tender centers that are perfect with butter, eggs, cheese, jam, or your favorite breakfast toppings.
Making English muffins at home also gives you more control over the ingredients. You can choose your preferred gluten-free flour blend and adjust the flavor depending on whether you want a sweet or savory breakfast.
Why You’ll Love These Homemade Gluten-Free English Muffins
There is something special about a warm English muffin straight from the skillet. The homemade version is fresh, simple, and easy to customize.
These English muffins are:
- Completely gluten-free when made with certified gluten-free ingredients
- Soft and tender inside
- Lightly golden on the outside
- Excellent when toasted
- Great for breakfast sandwiches
- Easy to freeze for later
- Made without complicated equipment
The texture is especially good when you split the muffins with a fork instead of cutting them completely smooth with a knife. This helps create the little nooks and crannies that hold butter, jam, or other toppings.
Ingredients
For this homemade recipe, you will need:
- 2 cups gluten-free all-purpose flour blend
- 1 tablespoon granulated sugar
- 1 teaspoon instant yeast
- 1/2 teaspoon salt
- 1 teaspoon baking powder
- 1 teaspoon xanthan gum, if your flour blend does not already contain it
- 3/4 cup warm milk
- 1 large egg
- 1 tablespoon melted butter or olive oil
- 1 teaspoon apple cider vinegar
- Gluten-free cornmeal or rice flour, for dusting
- A little butter or oil for cooking
For anyone with celiac disease or a strict gluten-free requirement, check the labels of every packaged ingredient. It is also important to avoid cross-contact with regular wheat flour during preparation.
How to Make Gluten-Free English Muffins
Step 1: Prepare the Yeast
Warm the milk until it is comfortably warm but not hot.
Pour it into a small bowl and add the sugar and instant yeast. Stir gently and let the mixture sit for about 5 minutes.
You may notice a little foam forming on top. This is a good indication that the yeast is active.
Avoid using very hot milk because excessive heat can affect the yeast.
Step 2: Combine the Dry Ingredients
Add the gluten-free flour, salt, baking powder, and xanthan gum to a large mixing bowl.
Mix well so everything is evenly distributed.
If your gluten-free flour blend already contains xanthan gum, you can leave the additional xanthan gum out.
Step 3: Add the Wet Ingredients
Pour the yeast mixture into the dry ingredients.
Add the egg, melted butter or olive oil, and apple cider vinegar.
Stir everything together with a sturdy spoon or spatula.
The dough will be softer and stickier than traditional wheat bread dough. That is completely normal for gluten-free dough.
Do not try to knead it for a long time. Once all the ingredients are combined and there are no obvious dry patches, the dough is ready.
Step 4: Let the Dough Rise
Cover the bowl loosely with plastic wrap or a clean kitchen towel.
Place it somewhere warm and allow it to rest for approximately 45 to 60 minutes.
The dough may become noticeably puffier, although it may not double in size like traditional wheat dough.
This resting time is important because it gives the yeast time to work and allows the gluten-free flour to absorb the liquid.
Step 5: Shape the Muffins
Lightly dust a work surface with gluten-free cornmeal or rice flour.
Carefully transfer the dough onto the prepared surface.
Divide it into 6 to 8 equal portions.
Gently shape each portion into a thick round. Try not to press the dough too much.
Lightly coat both sides with cornmeal or rice flour.
Place the shaped muffins on a parchment-lined tray and allow them to rest for another 15 to 20 minutes.
Step 6: Cook on a Skillet
Heat a large nonstick skillet or griddle over low to medium-low heat.
Add a small amount of butter or oil and spread it over the cooking surface.
Carefully place the muffins into the skillet, leaving space between them.
Cook for about 5 to 7 minutes on the first side.
The bottom should become lightly golden.
Carefully flip the muffins and cook for another 5 to 7 minutes.
The key is to avoid using very high heat. If the outside becomes dark before the center is cooked, lower the temperature.
For thicker muffins, covering the skillet for part of the cooking time can help the centers cook more evenly.
Step 7: Cool Before Splitting
Once cooked, transfer the English muffins to a wire rack.
Allow them to cool for several minutes.
For the classic English muffin texture, gently split them with a fork. This helps preserve the uneven texture inside.
If the center still appears wet or gummy, return the muffin to the skillet over low heat for a few more minutes.
How to Serve Them
These homemade gluten-free English muffins are delicious toasted.
For a simple breakfast, toast one and spread it with butter and your favorite jam.
For something savory, try:
- Fried egg and cheese
- Scrambled eggs and avocado
- Turkey and cheese
- Cream cheese and smoked salmon
- Egg and spinach
- Peanut butter and banana
- Cottage cheese and fresh fruit
They also make a great base for quick breakfast sandwiches.
Helpful Tips
Choose a Good Gluten-Free Flour
Not every gluten-free flour blend behaves the same way. A good all-purpose gluten-free baking blend generally works best for this recipe.
If your blend contains xanthan gum, you usually do not need to add more.
Keep the Heat Moderate
English muffins need enough time to cook through. A skillet that is too hot can brown the outside while leaving the center undercooked.
Low to medium-low heat gives the muffins more time to cook evenly.
Don’t Add Too Much Flour
Because gluten-free dough can feel sticky, it may be tempting to keep adding flour.
Try to resist adding too much. Excess flour can make the finished muffins heavy and dry.
Use a light dusting of gluten-free flour or cornmeal when shaping them.
Let Them Rest
The resting periods are important. They improve the texture and give the yeast time to work.
Storage
Allow the muffins to cool completely before storing them.
Keep them in an airtight container at room temperature for up to 2 days.
For longer storage, place them in the refrigerator.
These English muffins also freeze very well. Slice them before freezing and place parchment paper between them if you want to remove individual muffins easily.
When you’re ready to eat one, simply toast it from frozen or allow it to thaw before reheating.
Make-Ahead Breakfast
These homemade muffins are perfect for meal prep.
Make a batch at the weekend, allow them to cool, slice them, and freeze them individually.
During the week, you can take one directly from the freezer and toast it while preparing your coffee or breakfast.
They can be turned into breakfast sandwiches with eggs and cheese or enjoyed simply with butter.
Variations
For a savory version, add a small amount of dried herbs such as oregano, basil, or Italian seasoning.
For a slightly sweeter muffin, add a little extra sugar and serve with butter, honey, or fruit preserves.
You can also sprinkle gluten-free seeds over the outside before cooking. Sesame, sunflower, pumpkin, or flax seeds can add extra texture.
Final Thoughts
These Gluten-Free English Muffins are a simple homemade alternative to packaged gluten-free bread. They are soft inside, lightly golden outside, and especially delicious after toasting.
The recipe is easy to prepare with basic ingredients, and once you make a batch, they can be stored or frozen for quick breakfasts throughout the week.
Whether you prefer them with butter and jam or loaded with eggs and cheese, homemade gluten-free English muffins are a versatile breakfast option that is worth keeping in your recipe collection.

