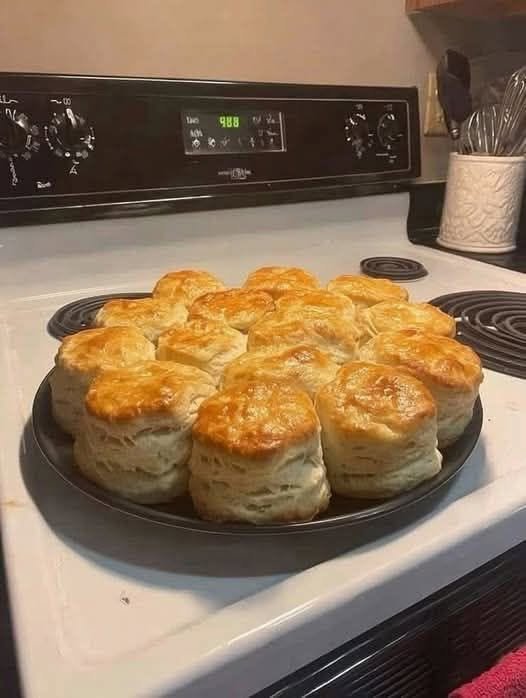
These Gluten-Free Buttermilk Biscuits are soft, fluffy, buttery, and beautifully golden on top. They have crisp edges, tender layers, and a light texture that makes them perfect served warm from the oven. If you miss classic homemade biscuits after going gluten-free, this recipe is a simple way to enjoy that comforting texture again.
The secret is keeping the butter cold, handling the dough gently, and using enough buttermilk to create a soft dough without making it overly wet. These biscuits are wonderful for breakfast, brunch, or alongside soups, chicken, eggs, or a simple dinner.
Why You’ll Love These Gluten-Free Biscuits
Gluten-free baking can sometimes produce biscuits that are dry or crumbly, but these biscuits are designed to stay tender and moist. Cold butter creates little pockets throughout the dough as it melts in the oven, helping give the biscuits their flaky layers.
Buttermilk adds a mild tang and helps keep the inside soft. A little baking powder and baking soda give the biscuits their rise, while a gluten-free flour blend provides the structure.
For the best results, use a gluten-free flour blend that contains xanthan gum. If your flour blend does not contain xanthan gum, add about 1/2 teaspoon to the dry ingredients.
Ingredients
- 2 1/2 cups gluten-free all-purpose flour blend
- 1 tablespoon baking powder
- 1/2 teaspoon baking soda
- 1 teaspoon salt
- 1 tablespoon granulated sugar
- 1/2 cup cold unsalted butter, cut into small cubes
- 1 cup cold buttermilk
- 1 large egg
- 1 tablespoon melted butter, for brushing the tops
Optional
- 1/2 teaspoon garlic powder for savory biscuits
- 1 teaspoon dried parsley or chives
- Extra melted butter for serving
Preparing the Dough
Start by preheating your oven to 425°F (220°C). Line a baking sheet with parchment paper or lightly grease it.
In a large mixing bowl, combine the gluten-free flour, baking powder, baking soda, salt, and sugar. Whisk everything together until evenly combined.
Add the cold cubed butter. Using a pastry cutter, fork, or your fingertips, work the butter into the flour until the mixture resembles coarse crumbs. You do not want the butter to completely disappear. Small pieces of cold butter are important because they help create flaky layers while the biscuits bake.
In a separate bowl, whisk together the cold buttermilk and egg.
Pour the wet ingredients into the dry mixture. Stir gently with a wooden spoon or spatula until a soft dough forms. Do not overmix. Gluten-free dough does not need traditional kneading, and excessive mixing can make the biscuits heavier.
The dough should be soft and slightly sticky but still manageable. If it seems extremely dry, add another tablespoon of buttermilk at a time until it comes together.
Shaping the Biscuits
Lightly dust a clean work surface with gluten-free flour. Turn the dough onto the surface and gently pat it into a rectangle about 3/4-inch to 1-inch thick.
For extra flaky layers, gently fold the dough in half and pat it down again. Repeat this process two or three times. Keep the handling gentle and avoid pressing the dough too much.
Use a round biscuit cutter to cut the biscuits. Press the cutter straight down without twisting. Twisting can seal the edges and prevent the biscuits from rising properly.
Place the biscuits close together on the prepared baking sheet. Keeping them close helps the sides stay soft while the tops become beautifully golden.
Gather any remaining dough and gently press it together to make additional biscuits. Try not to repeatedly knead the scraps.
Brush the tops lightly with melted butter.
Baking
Place the baking sheet in the preheated oven and bake for approximately 15–20 minutes, or until the biscuits are puffed and golden brown on top.
The exact baking time can vary depending on the size and thickness of your biscuits. Start checking around 15 minutes.
When they are finished, remove them from the oven and brush the tops with a little more melted butter if desired.
Let the biscuits cool for about 5 minutes before serving. They are especially delicious while still warm.
How to Get Soft and Fluffy Biscuits
The temperature of your ingredients matters. Keep the butter and buttermilk cold until you are ready to use them. Warm butter can blend too completely into the flour, which may result in biscuits with less texture.
Do not add too much flour when shaping the dough. A slightly soft dough generally produces more tender biscuits than a stiff, heavily floured dough.
Another important tip is not to overwork the dough. Gluten-free biscuits do not require kneading like traditional wheat biscuits. Gentle handling is enough.
For taller biscuits, make the dough slightly thicker before cutting. A dough thickness of about 1 inch gives the biscuits room to rise.
Serving Ideas
These gluten-free buttermilk biscuits are delicious with butter and honey for breakfast. You can also serve them with jam, strawberry preserves, or homemade fruit spread.
For a savory meal, serve them alongside scrambled eggs, sausage, roasted chicken, soups, stews, or vegetables.
You can also split the biscuits and use them for breakfast sandwiches. Add eggs, cheese, bacon, sausage, or another favorite filling.
For a simple dinner side, brush the freshly baked biscuits with melted butter mixed with a little garlic and parsley.
Storage
These biscuits are best served fresh, but leftovers can be stored in an airtight container at room temperature for up to 2 days.
For longer storage, allow the biscuits to cool completely and place them in a freezer-safe bag or container. Freeze for up to 2 months.
To reheat, place frozen or refrigerated biscuits in a 350°F (175°C) oven until warmed through. You can also microwave them briefly, although the oven will help restore a better texture.
Can You Make the Dough Ahead?
Yes. You can prepare the dough, cut the biscuits, and place them on a lined baking sheet. Cover them well and refrigerate them until you are ready to bake.
For the best texture, bake them within a few hours. Because the dough contains cold butter and buttermilk, keeping it chilled helps maintain the flaky texture.
You can also freeze unbaked biscuits. Place the cut biscuits on a tray and freeze until firm, then transfer them to a freezer-safe container. Bake directly from frozen, adding a few extra minutes to the baking time.
Recipe Tips
Use a good gluten-free flour blend: Different gluten-free flours absorb liquid differently, so choose a reliable all-purpose blend designed for baking.
Keep the butter cold: Cold butter is one of the keys to flaky biscuits.
Do not overmix: Stir just until the dough comes together.
Do not twist the cutter: Press straight down to help the biscuits rise evenly.
Bake immediately: Once the dough is prepared, getting the biscuits into the hot oven helps give them their best rise.
Check the label: If you need the recipe to be strictly gluten-free, make sure every ingredient, including the flour blend, baking powder, and other packaged ingredients, is certified gluten-free according to your needs.
Final Thoughts
There is something special about a basket of warm homemade biscuits fresh from the oven. These Gluten-Free Buttermilk Biscuits have golden tops, soft centers, buttery flavor, and tender layers that make them easy to enjoy with almost any meal.
Serve them warm with butter and honey, turn them into breakfast sandwiches, or pair them with a comforting bowl of soup. Once you see how simple homemade gluten-free biscuits can be, you may want to keep a batch ready for weekend breakfasts and family dinners.

