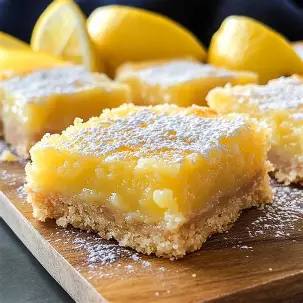
These Easy Gluten-Free Lemon Dessert Bars are bright, buttery, creamy, and full of fresh lemon flavor. They have a tender gluten-free crust topped with a smooth, tangy lemon filling that sets beautifully in the oven. Finished with a light dusting of powdered sugar, these bars make a simple but impressive dessert for family gatherings, afternoon tea, holidays, parties, or everyday baking.
If you love lemon desserts, this recipe is a wonderful choice. The sweet crust balances the tart lemon filling, creating a refreshing dessert that doesn’t feel too heavy. Best of all, the recipe uses simple ingredients that are easy to find.
Because gluten-free baking can sometimes require special attention to texture, this recipe uses a reliable gluten-free flour blend to create a crust that holds together while remaining tender and buttery.
Why You’ll Love These Lemon Bars
There are plenty of reasons to keep this recipe in your regular baking rotation:
- Completely gluten-free when using certified gluten-free ingredients
- Bright and refreshing lemon flavor
- Buttery, tender crust
- Smooth and creamy lemon filling
- Easy preparation
- Great for beginners
- Perfect for parties and gatherings
- Can be prepared ahead of time
- Delicious chilled or at room temperature
- Beautiful with a simple powdered sugar topping
These lemon bars are especially good when served cold from the refrigerator, making them an excellent make-ahead dessert.
Ingredients
For the Gluten-Free Crust
- 1½ cups (180 g) gluten-free all-purpose flour blend
- ½ cup (100 g) granulated sugar
- ½ cup (113 g) unsalted butter, melted
- ¼ teaspoon salt
- ½ teaspoon vanilla extract
For the Lemon Filling
- 4 large eggs
- 1 cup (200 g) granulated sugar
- ⅔ cup (160 ml) fresh lemon juice
- 2 tablespoons finely grated lemon zest
- ¼ cup (30 g) gluten-free all-purpose flour
- ¼ teaspoon salt
For Finishing
- Powdered sugar, for dusting
- Thin lemon slices, optional
- Fresh berries, optional
Important Gluten-Free Notes
For this recipe to remain gluten-free, make sure every packaged ingredient is labeled gluten-free when necessary.
The most important ingredient is the flour blend. Choose a gluten-free all-purpose flour designed for baking.
If you are preparing the bars for someone who must strictly avoid gluten, also pay attention to cross-contact. Use clean bowls, utensils, baking pans, and work surfaces that have not been contaminated with regular wheat flour.
Some powdered sugars, flavorings, and other packaged ingredients can vary by brand, so checking labels is always a good idea.
Equipment
You will need:
- 8-inch or 9-inch square baking pan
- Parchment paper
- Mixing bowls
- Whisk
- Measuring cups and spoons
- Fine grater or zester
- Citrus juicer
- Spatula
- Cooling rack
Preparing the Baking Pan
Preheat your oven to 350°F (175°C).
Line an 8-inch or 9-inch square baking pan with parchment paper.
Leave some parchment hanging over two sides of the pan. This creates handles that make it much easier to lift the finished lemon bars from the pan.
Lightly grease the parchment if desired.
Step 1: Make the Gluten-Free Crust
Add the gluten-free flour, granulated sugar, salt, melted butter, and vanilla extract to a mixing bowl.
Stir until the ingredients are evenly combined and a soft, crumbly dough forms.
The mixture should hold together when pressed between your fingers.
If it seems slightly dry, continue mixing gently until the butter has been evenly distributed.
Step 2: Press the Crust Into the Pan
Transfer the crust mixture into the prepared baking pan.
Use the back of a spoon, spatula, or the bottom of a flat measuring cup to press the mixture firmly and evenly across the bottom.
Try to create an even layer from edge to edge.
An evenly pressed crust helps the finished lemon bars bake consistently.
Step 3: Bake the Crust
Place the crust into the preheated oven.
Bake for approximately 15–18 minutes.
The edges should look lightly golden, while the center should appear set.
Do not allow the crust to become very dark because it will continue baking later with the lemon filling.
Remove the pan from the oven and set it aside while preparing the filling.
Step 4: Prepare the Lemon Filling
In a clean mixing bowl, whisk together the eggs and granulated sugar.
Whisk until the mixture is smooth.
Add the fresh lemon juice and finely grated lemon zest.
Stir gently until combined.
Add the gluten-free flour and salt.
Whisk until the mixture is smooth and there are no obvious lumps.
Fresh lemon juice makes a big difference in this recipe. Bottled lemon juice can be used in a pinch, but freshly squeezed lemons provide a brighter and more natural flavor.
Step 5: Pour the Filling Over the Crust
Slowly pour the lemon filling over the warm baked crust.
Try to distribute it evenly across the entire surface.
Return the pan to the oven.
Step 6: Bake the Lemon Bars
Bake for approximately 20–25 minutes.
The filling should look set around the edges and slightly firm in the center.
It may have a very subtle wobble when you gently move the pan, but it should not look liquid.
Avoid overbaking because the lemon filling can become dry or develop cracks.
Step 7: Cool Completely
Remove the lemon bars from the oven.
Allow them to cool in the pan at room temperature for approximately 1 hour.
Then transfer the pan to the refrigerator.
Chill for at least 2 hours before slicing.
For the cleanest cuts, chilling the bars overnight works especially well.
Step 8: Remove and Slice
Once completely chilled, use the parchment paper handles to lift the lemon bars from the pan.
Place them on a cutting board.
Use a sharp knife to cut them into squares or rectangles.
For especially clean slices, wipe the knife between cuts.
Step 9: Add Powdered Sugar
Just before serving, dust the top generously with powdered sugar.
You can also add a little lemon zest, fresh berries, or very thin lemon slices for decoration.
The simple white powdered sugar against the bright yellow filling creates a beautiful presentation.
Tips for Perfect Lemon Bars
Use Fresh Lemons
Fresh lemon juice and zest provide the best flavor.
Avoid using only bottled lemon juice if possible.
Don’t Overbake
The lemon filling should be set but still tender.
Overbaking can make the filling rubbery or dry.
Chill Before Cutting
Warm lemon bars are difficult to slice neatly.
Refrigeration allows the filling to firm up and makes cutting much easier.
Press the Crust Firmly
A firmly pressed crust will hold together much better when the bars are sliced.
Measure Gluten-Free Flour Carefully
Different gluten-free flour blends can have different weights and absorbency.
Using a kitchen scale is recommended for consistent results.
Flavor Variations
Raspberry Lemon Bars
Add fresh raspberries to the top before serving.
The tart berries pair beautifully with lemon.
Blueberry Lemon Bars
Serve with fresh blueberries or fold a small amount of blueberries into the topping.
Coconut Lemon Bars
Add finely shredded unsweetened coconut to the crust for a tropical twist.
Extra Lemon
For a stronger citrus flavor, increase the lemon zest slightly.
Lemon and White Chocolate
Drizzle cooled bars with melted white chocolate for a richer dessert.
How to Store
Store the lemon bars in an airtight container in the refrigerator.
They will keep well for approximately 4–5 days.
Keep them chilled until you’re ready to serve.
If stacking the bars, place parchment paper between the layers to prevent sticking.
Can You Freeze Lemon Bars?
Yes, these lemon bars freeze well.
Cut the completely chilled bars into individual portions.
Wrap each piece tightly in plastic wrap and place the wrapped pieces in a freezer-safe container.
Freeze for up to approximately 2–3 months.
Thaw the bars overnight in the refrigerator.
Dust with powdered sugar after thawing rather than before freezing for the best appearance.
Serving Suggestions
These gluten-free lemon bars are delicious served on their own, but you can make them extra special with:
- Fresh berries
- Whipped cream
- Vanilla ice cream
- Greek yogurt
- Fresh mint
- Powdered sugar
- Lemon zest
For afternoon tea, serve small squares alongside tea or coffee.
For a dinner party, serve a chilled lemon bar with a small scoop of vanilla ice cream.
Frequently Asked Questions
Are these lemon bars gluten-free?
Yes, when made with a certified gluten-free flour blend and other gluten-free ingredients. Always check product labels if preparing them for someone with strict gluten-free requirements.
Can I use almond flour?
Almond flour alone is not a direct one-to-one substitute for a gluten-free all-purpose flour blend because it behaves differently during baking.
For the most reliable texture, use a gluten-free flour blend intended for baking.
Can I use bottled lemon juice?
Fresh lemon juice is recommended because it gives the bars a brighter flavor, but bottled juice can work if necessary.
Why is my lemon filling too soft?
The bars may need additional baking time, or they may not have chilled long enough.
Allow them to cool completely and refrigerate for several hours before judging the final texture.
Why did my crust crumble?
The crust may not have been pressed firmly enough, or the flour blend may absorb moisture differently.
Press the crust firmly and allow the finished bars to cool completely before cutting.
Can I make these ahead of time?
Absolutely. Lemon bars are excellent for make-ahead desserts.
Prepare them the day before serving and keep them refrigerated.
Recipe Summary
Prep Time: 20 minutes
Crust Bake Time: 15–18 minutes
Filling Bake Time: 20–25 minutes
Cooling Time: 1 hour
Chilling Time: 2 hours
Total Time: Approximately 4 hours
Yield: 16 lemon bars
Difficulty: Easy
Diet: Gluten-Free
Final Thoughts
These Easy Gluten-Free Lemon Dessert Bars are proof that gluten-free baking can be simple, delicious, and beautiful. The buttery gluten-free crust provides a tender base for the smooth, bright lemon filling, while powdered sugar adds the perfect finishing touch.
The recipe is ideal for anyone looking for a refreshing dessert that can be prepared ahead of time. The bars are easy enough for everyday baking but elegant enough for holidays, birthdays, afternoon tea, and special gatherings.
For the best results, use fresh lemons, measure your gluten-free flour carefully, avoid overbaking, and give the finished bars plenty of time to chill before slicing.
Once you make these bright and creamy lemon bars, they may quickly become a favorite gluten-free dessert in your kitchen.

