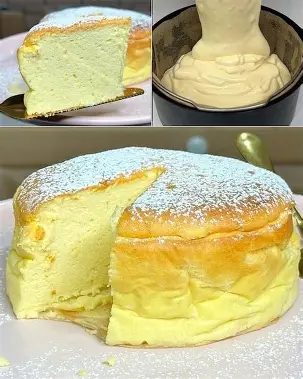
If you’ve been missing the light, airy texture of a classic sponge cake since going keto, this recipe is about to become your new favorite. Fluffy keto cloud cake is inspired by the technique behind Japanese soufflé cheesecake — instead of relying on flour for structure, it gets its incredible lift from whipped egg whites folded into a rich, creamy base. The result is a cake that’s soft, jiggly, subtly sweet, and practically melts in your mouth, all while staying low-carb and gluten-free. It’s the kind of dessert that looks impressive but is genuinely simple once you understand the technique.
Why This Cake Works
Traditional cakes get their structure from flour and gluten. Since keto baking eliminates flour, this recipe leans entirely on whipped egg whites for volume and cream cheese for richness and stability. The magic lies in the meringue — when egg whites are whipped to stiff, glossy peaks and gently folded into the batter, they trap thousands of tiny air bubbles. During baking, those bubbles expand and set, giving you that signature “cloud” texture: delicate, light, and almost cheesecake-like in flavor.
Ingredients (Makes 8 Servings)
- 6 large eggs, separated
- 225g (about 8 oz) full-fat cream cheese, softened
- ¼ teaspoon cream of tartar
- 4 tablespoons powdered erythritol or your favorite keto-friendly sweetener, divided
- 1 teaspoon vanilla extract
- ¼ teaspoon fine sea salt
- 2 tablespoons heavy cream
- 1 teaspoon lemon juice
A note on ingredients: use full-fat cream cheese for the best texture — low-fat versions tend to be watery and can affect how well the batter holds together. Powdered (not granular) sweetener is important too, since it dissolves more smoothly into the egg whites without leaving a gritty texture.
Step-by-Step Instructions
1. Prep your oven and pan. Preheat the oven to 150°C (300°F). Line the bottom of a 20cm (8-inch) round cake pan with parchment paper. Do not grease the sides of the pan — this might seem counterintuitive, but the batter actually needs to cling to the ungreased sides in order to climb and rise properly, exactly like a chiffon cake.
2. Separate the eggs carefully. Crack all 6 eggs, separating the yolks into one large bowl and the whites into another. Both bowls need to be completely clean and grease-free, and the whites especially cannot have a single trace of yolk in them. Even a tiny bit of fat will prevent the whites from whipping up properly, so take your time with this step — it’s worth doing one egg at a time over a separate small bowl before transferring.
3. Make the yolk base. To the bowl of egg yolks, add the softened cream cheese, vanilla extract, salt, heavy cream, and 2 tablespoons of the sweetener (half the total amount). Using a hand mixer or stand mixer, beat on medium speed for 2–3 minutes until the mixture is completely smooth, pale, and creamy, with no lumps of cream cheese remaining. This forms the rich, flavorful base of your cake.
4. Whip the egg whites into a meringue. In your clean bowl of egg whites, add the cream of tartar and lemon juice — both help stabilize the whites so they hold their shape. Beat on medium speed until frothy, about 1 minute, then increase to high speed. Gradually sprinkle in the remaining 2 tablespoons of sweetener while continuing to beat. Keep going until you reach stiff, glossy peaks — when you lift the beaters out, the peaks should stand up straight without drooping or flopping over. This usually takes about 4–5 minutes total.
5. Fold the whites into the yolk mixture. This is the most important step for achieving that cloud-like texture. Add about one-third of the whipped egg whites to the yolk mixture first, and stir it in fairly firmly — this initial addition is meant to lighten the dense batter, so don’t worry about being too gentle here. Then add the remaining egg whites in two more additions, this time folding very gently with a spatula using a slow under-and-over motion, rotating the bowl as you go. Stop as soon as no white streaks remain. Overmixing at this stage will knock the air back out, and that trapped air is exactly what gives the cake its signature light, cloud-like rise.
6. Pour and tap. Gently pour the batter into your prepared pan, smoothing the top with a spatula. Tap the pan firmly on the counter two or three times to release any large trapped air bubbles that could cause uneven baking.
7. Bake in a water bath. Place the cake pan inside a larger roasting tray, then pour hot water into the tray until it reaches about 2cm (1 inch) up the sides of the cake pan. This water bath is essential — it keeps the baking environment humid and gentle, which prevents the cake from cracking on top or drying out. Bake for about 50 minutes, or until the top turns a light golden color and a skewer inserted into the center comes out clean.
8. Cool slowly, right in the oven. Once baked, turn off the oven, crack the door open slightly, and leave the cake inside for another 15 minutes. This gradual temperature change prevents the delicate structure from suddenly collapsing or sinking in the middle, which is a very common issue with light, airy cakes like this one if they’re cooled too quickly.
9. Chill before slicing. Remove the cake from its water bath and let it cool completely to room temperature on a wire rack. Then refrigerate it for at least 2 hours. This chilling step firms up the cream cheese structure, making the cake much easier to slice cleanly.
10. Slice and serve. Run a thin knife around the edge of the pan to loosen the cake, then transfer it to a serving plate. For a finishing touch, dust the top with a little extra powdered sweetener, or add fresh berries and a dollop of unsweetened whipped cream. Slice gently with a sharp knife — the texture should be soft, slightly jiggly, and wonderfully light.
Notes and Variations
This cake keeps well covered in the fridge for up to 4 days, and it also freezes nicely for up to a month — just thaw it in the refrigerator before serving. If you want a chocolate version, simply whisk 2 tablespoons of unsweetened cocoa powder into the yolk mixture before folding in the whites. Each slice comes out to roughly 2–3g of net carbs, depending on which sweetener you use, making this a genuinely indulgent treat that still fits comfortably into a keto lifestyle.

