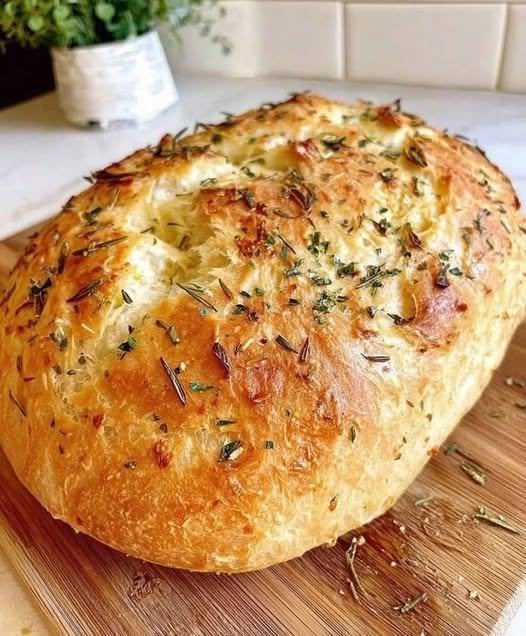
There is something special about a loaf of homemade bread with a crisp, golden crust and a soft, flavorful center. This Rustic No-Knead Rosemary Garlic Bread is one of those recipes that looks impressive but requires very little hands-on work. You do not need a stand mixer, special bread machine, or complicated kneading technique. A bowl, a spoon, and a little patience are enough.
Fresh rosemary and garlic give this bread a wonderful savory aroma, while the long resting time helps create a light, rustic texture. The outside becomes beautifully crisp while the inside stays soft and chewy. It is perfect alongside soups, pasta, roasted vegetables, grilled meats, or simply sliced warm and served with butter.
The best part is that most of the work happens while the dough rests. Mix the ingredients, let the dough rise, shape it gently, and bake. It is an excellent recipe for anyone who wants homemade artisan-style bread without spending hours working with dough.
Why You’ll Love This Bread
This rosemary garlic bread is simple enough for beginners but satisfying enough for experienced home bakers.
- No kneading required
- Simple pantry ingredients
- Fresh rosemary and garlic add plenty of flavor
- Crisp, rustic crust
- Soft and chewy center
- Minimal hands-on preparation
- Great with soups, pasta, and dinners
- Makes a beautiful homemade loaf for sharing
Ingredients
For the Bread
- 3 cups all-purpose flour or bread flour
- 1 1/2 teaspoons salt
- 1 teaspoon instant yeast
- 1 1/2 cups warm water
- 2 tablespoons olive oil
- 2 tablespoons fresh rosemary, finely chopped
- 3 cloves garlic, finely minced
Optional Topping
- 1 teaspoon olive oil
- 1 small sprig fresh rosemary
- A small pinch of flaky salt
Bread flour will give the loaf a slightly chewier texture, while all-purpose flour works very well and produces a tender rustic loaf.
Step 1: Prepare the Garlic and Rosemary
Start by finely chopping the fresh rosemary. Fresh rosemary is recommended because it gives the bread a brighter aroma and more noticeable flavor.
Mince the garlic very finely so that it distributes evenly throughout the dough. You can use three cloves for a balanced garlic flavor or add another clove if you prefer a stronger taste.
Avoid leaving large pieces of garlic in the dough because they can create pockets of moisture and make the bread harder to shape.
Step 2: Mix the Dough
Add the flour, salt, and instant yeast to a large mixing bowl. Stir everything together with a wooden spoon or spatula.
Add the chopped rosemary and minced garlic, then mix again.
Pour in the warm water and olive oil. Stir until the flour is fully moistened and a rough, sticky dough forms.
The dough should look shaggy and somewhat sticky. Do not worry if it does not look smooth at this stage. Since this is a no-knead recipe, you do not need to work the dough until it becomes elastic.
If the dough seems extremely dry, add another tablespoon of water. If it appears unusually wet, sprinkle in a small amount of flour.
Step 3: Let the Dough Rise
Cover the bowl tightly with plastic wrap, a reusable cover, or a clean kitchen towel.
Let the dough rest at room temperature for approximately 8 to 12 hours.
Overnight is especially convenient. You can mix the dough in the evening and finish the bread the following morning.
During this long resting period, the yeast slowly develops the dough. This gives the bread its rustic texture and deeper flavor without requiring traditional kneading.
The dough should become noticeably puffy and may develop bubbles across the surface.
Step 4: Shape the Loaf
Once the dough has risen, lightly flour your work surface.
Carefully transfer the dough onto the floured surface. Try not to press all the air out of it because those bubbles help create the open texture inside the finished bread.
Using lightly floured hands, gently shape the dough into a round loaf.
You do not need perfect shaping. A rustic appearance is part of the charm of this bread.
Place the shaped dough on a piece of parchment paper and cover it loosely. Let it rest for another 30 to 45 minutes while you prepare the oven.
Step 5: Preheat the Oven
Place a Dutch oven with its lid inside the oven.
Preheat the oven to 450°F (230°C).
Allow the Dutch oven to heat for at least 30 minutes.
A very hot Dutch oven helps the dough develop a beautiful crust. The covered environment also traps steam during the beginning of baking, which helps the bread rise and keeps the crust from becoming hard too quickly.
Be extremely careful when handling the hot Dutch oven because both the pot and lid will be very hot.
Step 6: Transfer the Dough
Carefully remove the hot Dutch oven from the oven.
Using the parchment paper, lower the shaped dough into the Dutch oven.
If desired, brush the top lightly with about a teaspoon of olive oil. You can also place a small rosemary sprig on top and sprinkle with a little flaky salt.
For a traditional rustic appearance, use a sharp knife or bread lame to make one or two shallow cuts across the top of the dough. This gives the steam a controlled place to escape as the bread expands.
Immediately cover the Dutch oven with its lid.
Step 7: Bake
Bake the covered bread at 450°F (230°C) for 25 minutes.
After 25 minutes, carefully remove the lid.
Continue baking uncovered for another 15 to 20 minutes, or until the loaf becomes deeply golden brown and the crust looks crisp.
The exact baking time can vary depending on your oven and the size of your loaf.
If you prefer a lighter crust, remove the bread a little earlier. For a darker, extra-crispy crust, allow it to bake a few additional minutes.
Step 8: Cool Before Slicing
Remove the finished bread from the Dutch oven and place it on a wire rack.
This is the hardest part because the rosemary and garlic aroma will make you want to slice it immediately.
However, allow the loaf to cool for at least 45 to 60 minutes before cutting.
Cooling allows the interior to finish setting. Cutting too soon can release steam and leave the center slightly gummy.
Once cooled, slice the bread with a serrated bread knife.
Tips for Successful No-Knead Bread
Use Fresh Yeast
Make sure your yeast is reasonably fresh. Old yeast may result in a loaf that rises slowly or does not rise enough.
Don’t Add Too Much Flour
No-knead dough is naturally sticky. Adding large amounts of extra flour can make the finished bread dense.
Use just enough flour to handle the dough comfortably.
Give the Dough Enough Time
The long rise is one of the most important parts of this recipe. A slow rise allows the dough to develop flavor and structure.
If your kitchen is particularly cool, the dough may need additional time.
Use a Hot Dutch Oven
A preheated Dutch oven provides the heat and steam needed for a crusty artisan-style loaf.
If you do not have a Dutch oven, you can bake the bread on a preheated baking sheet or heavy oven-safe pan, although the crust may be somewhat different.
Watch the Garlic
Fresh garlic provides excellent flavor, but too much can overpower the rosemary and bread itself. Three cloves create a noticeable but balanced garlic flavor.
If you love garlic, you can increase the amount slightly.
How to Store Rosemary Garlic Bread
Allow the loaf to cool completely before storing it.
Keep it at room temperature in a bread bag, paper bag, or loosely wrapped clean kitchen towel for up to 2 days for the best texture.
Avoid storing rustic bread in the refrigerator because refrigeration can cause bread to become stale more quickly.
For longer storage, slice the bread and place the slices in a freezer-safe bag. Freeze for up to about 2 to 3 months. Individual slices can be reheated in a toaster or oven whenever you want fresh-tasting bread.
How to Serve It
This bread is incredibly versatile.
Serve warm slices with butter for a simple snack, or pair it with creamy soups, tomato soup, stews, pasta, roasted chicken, grilled meats, or salads.
It can also be sliced and toasted for sandwiches or used to make garlic toast.
For an extra savory side, brush slices with olive oil and lightly toast them until crisp.
Frequently Asked Questions
Can I use dried rosemary?
Yes. If fresh rosemary is unavailable, you can substitute dried rosemary. Start with about 1 teaspoon and adjust according to taste.
Can I prepare the dough the night before?
Absolutely. This is one of the easiest ways to make this recipe. Mix the dough in the evening, cover it, and let it rise overnight.
Why is my dough sticky?
Sticky dough is normal for no-knead bread. Avoid adding too much flour. Lightly flour your hands and work surface instead.
Can I use whole wheat flour?
You can replace part of the all-purpose or bread flour with whole wheat flour. Start by replacing about 1 cup of the white flour with whole wheat flour. The loaf may be slightly denser and have a more hearty flavor.
Can I make this without a Dutch oven?
Yes. A Dutch oven gives the best crust, but you can bake the loaf on a heavy baking sheet or oven-safe pan. Adding steam to the oven during the first part of baking can help improve the crust.
Final Thoughts
Rustic No-Knead Rosemary Garlic Bread is a wonderful recipe when you want homemade bread without complicated techniques. The combination of fragrant rosemary, savory garlic, crisp crust, and soft interior makes this loaf perfect for everyday meals and special dinners alike.
With just a few basic ingredients and some resting time, you can create a beautiful loaf that looks and tastes like it came from a small artisan bakery. Slice it thick, add a little butter, and enjoy it while it is still slightly warm.

