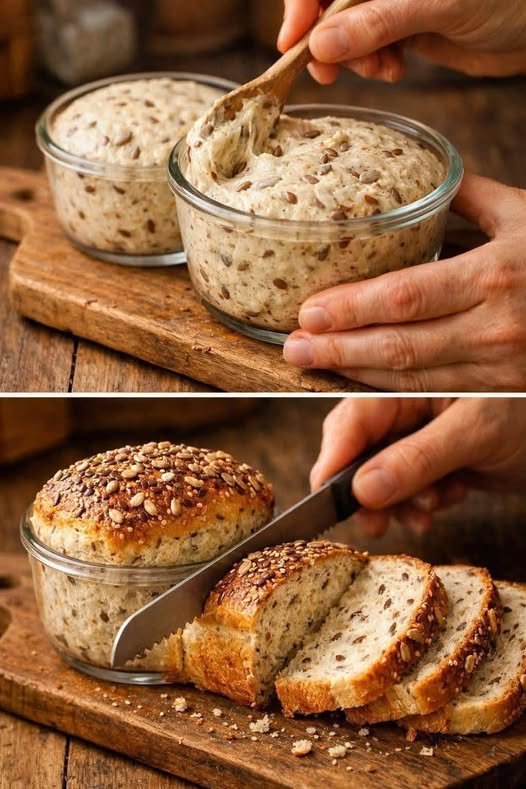
This 3-Ingredient Simple Gluten-Free Seeded Bread is an easy homemade bread with a soft, hearty center and a deliciously crunchy seeded crust. It is inspired by the rustic bread shown in the photo, where the loaf is generously covered with mixed seeds and sliced into thick, satisfying pieces.
The recipe is designed for people who want a simple gluten-free bread without a long list of ingredients. It is especially useful for breakfast, sandwiches, toast, or serving alongside soups and salads.
Because gluten-free flours behave differently from wheat flour, it is important to use a gluten-free bread flour or gluten-free all-purpose baking blend that works well with yeast. Always check the package to make sure it is certified gluten-free if you are preparing the bread for someone with celiac disease.
The three main ingredients are the gluten-free flour blend, seeds, and a suitable liquid. A little salt or seasoning can be added if desired, but the basic recipe keeps things very simple.
Ingredients
Main Ingredients
- 2 cups (240 g) gluten-free all-purpose flour or gluten-free bread flour
- 1 cup (240 ml) warm water
- ½ cup (70 g) mixed seeds
Optional
- ½ teaspoon salt
- 1 teaspoon gluten-free baking powder, if your flour blend does not contain a suitable leavening ingredient
- Extra mixed seeds for the top
- A small amount of olive oil for greasing the baking dish
Important: Gluten-free flour blends vary considerably. If using a yeast-based gluten-free bread flour, follow the package guidance for yeast and liquid amounts. The simple version above works best with a flour blend specifically designed for a quick gluten-free bread.
What Seeds Can You Use?
You can use almost any combination of seeds you enjoy.
Good choices include:
- Sunflower seeds
- Pumpkin seeds
- Sesame seeds
- Flaxseeds
- Chia seeds
- Hemp seeds
A combination of sunflower, pumpkin, sesame, and flax seeds gives the bread a beautiful appearance and a pleasant crunchy texture.
For a softer loaf, use mostly smaller seeds. For a crunchier loaf, add more sunflower or pumpkin seeds.
Why You’ll Love This Bread
This bread is:
- Gluten-free
- Simple to prepare
- Made with only a few main ingredients
- Full of crunchy seeds
- Great for breakfast
- Delicious toasted
- Suitable for sandwiches
- Easy to customize
- Perfect for homemade baking
It also makes a lovely rustic loaf without requiring complicated shaping.
Step 1: Prepare the Baking Pan
Preheat your oven to 375°F (190°C).
Lightly grease a small loaf pan or baking dish.
You can also line the pan with parchment paper to make removing the finished bread easier.
If you prefer a more rustic round loaf like the one shown in the photo, use a small round baking dish or oven-safe container.
Step 2: Prepare the Seeds
Place the mixed seeds in a bowl.
If you want a stronger nutty flavor, you can lightly toast the seeds in a dry skillet for a few minutes before using them.
Allow toasted seeds to cool before adding them to the dough.
You can reserve a few tablespoons of the seeds for sprinkling over the top of the bread.
Step 3: Combine the Flour and Seeds
Add the gluten-free flour to a large mixing bowl.
Add the mixed seeds.
If using salt, add it now.
Stir everything together until the seeds are evenly distributed throughout the flour.
This ensures that every slice will contain a good amount of seeds.
Step 4: Add the Warm Water
Slowly pour the warm water into the flour mixture.
Stir with a wooden spoon or sturdy spatula.
Gluten-free bread dough often looks different from traditional wheat dough.
Instead of forming a stretchy ball, it may resemble a thick, sticky batter or soft dough.
This is completely normal.
Do not add large amounts of extra flour simply because the mixture looks sticky.
Step 5: Mix Thoroughly
Continue stirring for approximately 2–3 minutes.
Make sure there are no large pockets of dry flour.
Scrape around the sides and bottom of the bowl.
The mixture should be evenly hydrated and thick.
If it appears extremely dry, add a small amount of water, one tablespoon at a time.
If it appears excessively wet, allow it to sit for several minutes before adding anything else because gluten-free flour can continue absorbing liquid as it rests.
Step 6: Rest the Dough
Cover the bowl with a clean kitchen towel.
Allow the mixture to rest for approximately 10–15 minutes.
This gives the gluten-free flour time to absorb the water and allows the seeds to become slightly hydrated.
After resting, the dough should feel thicker and easier to handle.
Step 7: Transfer to the Pan
Spoon the dough into the prepared loaf pan.
Use a damp spatula or the back of a spoon to smooth the surface.
Don’t worry about making it perfectly smooth.
A slightly rustic surface gives the bread a more homemade appearance.
Step 8: Add the Seed Topping
Sprinkle the reserved seeds generously over the top.
Gently press them into the surface so they stay attached after baking.
You can use sesame seeds, sunflower seeds, pumpkin seeds, flaxseeds, or any combination you like.
The seed topping is what gives the finished bread its beautiful rustic appearance.
Step 9: Bake
Place the pan in the center of the preheated oven.
Bake for approximately 35–45 minutes, depending on the size and shape of your pan.
The bread should become golden brown on top.
The surface should feel firm when gently pressed.
If the top is browning too quickly, loosely cover the bread with foil for the final part of baking.
Step 10: Check for Doneness
Insert a toothpick or skewer into the center.
It should come out mostly clean without wet dough.
If the center still looks very moist, continue baking for another 5–10 minutes.
Gluten-free bread can require slightly different baking times depending on the flour blend and moisture content.
Step 11: Cool Completely
Remove the bread from the oven.
Allow it to cool in the pan for approximately 10–15 minutes.
Then carefully transfer it to a wire rack.
Allow the loaf to cool completely before slicing.
This step is especially important for gluten-free bread because the inside continues to set as it cools.
Cutting it too early can make the center appear gummy or cause the slices to fall apart.
How to Serve It
This seeded gluten-free bread is delicious in many ways.
For breakfast, toast a slice and add butter, avocado, eggs, or cream cheese.
For lunch, use two slices to make a simple sandwich.
You can also serve it alongside:
- Vegetable soup
- Chicken soup
- Salads
- Scrambled eggs
- Cheese
- Hummus
- Avocado
- Nut butter
For a sweet option, toast the bread and serve it with a little peanut butter and berries.
Toasting the Bread
This bread becomes especially delicious when toasted.
Slice it once completely cooled.
Place a slice in a toaster or under a grill until the edges become crisp and golden.
The seeds become even more fragrant when toasted, giving each slice a wonderful nutty flavor.
Storage
Store the cooled bread in an airtight container or sealed bread bag.
Keep it at room temperature for approximately 1–2 days.
For longer storage, refrigerate it for up to 5 days.
Because gluten-free homemade bread can dry out more quickly than conventional bread, keeping it well covered is important.
Freezing Instructions
This bread freezes very well.
Allow the loaf to cool completely.
Slice it before freezing so you can remove individual pieces whenever needed.
Place parchment paper between slices if desired, then store them in a freezer-safe bag or container.
Freeze for up to 2–3 months.
To serve, place a frozen slice directly into the toaster or allow it to thaw at room temperature.
Tips for the Best Results
Use the Right Flour
Choose a gluten-free flour blend intended for bread or general baking.
Some gluten-free blends absorb much more liquid than others, so adjust the water slightly if necessary.
Don’t Expect Wheat Dough
Gluten-free dough usually won’t stretch or become elastic like traditional wheat dough.
A thick, sticky consistency is normal.
Let It Cool
Don’t rush to slice the bread straight from the oven.
Allowing it to cool completely gives the crumb time to set.
Don’t Overload With Seeds
Seeds add wonderful flavor and texture, but using too many can make the loaf difficult to hold together.
Keep the amount balanced with the flour.
Use Certified Gluten-Free Ingredients
If you are preparing this bread for someone with celiac disease, check every packaged ingredient and avoid cross-contact with wheat flour.
Optional Flavor Ideas
Garlic and Herb
Add dried garlic powder and Italian herbs for a savory version.
Everything Seed Bread
Use sesame seeds, poppy seeds, dried garlic, dried onion, and a little salt for an everything-style loaf.
Rosemary Seed Bread
Add finely chopped rosemary and a little olive oil for a fragrant homemade loaf.
Cheesy Seed Bread
Add a small amount of shredded cheese to the dough if dairy is suitable for your diet.
Frequently Asked Questions
Is this bread gluten-free?
Yes, when made with a certified gluten-free flour blend and gluten-free packaged ingredients.
Can I use almond flour?
Almond flour cannot usually replace a gluten-free bread flour blend at a 1:1 ratio because it behaves very differently and does not provide the same structure.
Can I use different seeds?
Absolutely. Use your favorite combination of sunflower, pumpkin, sesame, flax, chia, or hemp seeds.
Can I make the loaf without seeds?
Yes. Simply omit the seeds, although the texture and flavor will be different.
Why is my bread gummy?
The most common reasons are underbaking, too much liquid, or slicing the bread before it has cooled completely.
Allow it to bake fully and cool completely before slicing.
Final Thoughts
This 3-Ingredient Simple Gluten-Free Seeded Bread is a wonderful homemade option when you want something easy, rustic, and full of texture. The combination of a gluten-free flour blend and mixed seeds creates a satisfying loaf that works beautifully for toast, sandwiches, breakfast, or serving with a warm bowl of soup.
The recipe is also easy to customize with different seed combinations and savory flavors.
For the best result, use a gluten-free flour blend suitable for bread, measure the ingredients carefully, allow the dough to rest, bake until fully set, and let the loaf cool completely before slicing.
The finished bread should have a lightly crisp exterior, a tender center, and plenty of delicious seeds throughout. Serve it warm and toasted with your favorite topping for a simple homemade gluten-free bread that the whole family can enjoy.

